| ^ |
1. PROLOGUE |
| |
--->>>
The main protagonist, Harry Mason, is driving on the interstate towards Silent hill, his daughter, Cheryl, fast asleep with her “Drawing Block” held close to her. A motorcycle policewoman, Cybil Bennet, pulls up behind Harry's vehicle. Just moments earlier, Cybil received an urgent call to investigate Silent Hill in which she quickly responded to, hence being behind Harry's vehicle. Cheryl stirs and awakes with a bright smile as Cybil, the policewoman, passes Harry's vehicle. Cybil briefly slows and looks over at Harry, but then speeds off ahead of him into the distance. Moments later, Harry notices Cybil's motorcycle is crashed on the side of the road, but there is no one in sight. As if distracted by the crashed motorcycle, Harry is startled by a shadowy figure in the middle of the road. He swerves off to the side of the road, barely missing the mysterious person, and crashes through the side-barrier, blacking out. Harry winds up on Bachman Road in Silent Hill where his nightmare will begin.
Harry Mason awakes in his crashed Jeep to find that his daughter is missing and the passenger door was left wide open. He heads off into the foggy town of Silent Hill in search of Cheryl.
--->>>
|
| ^ |
2. NIGHTMARE |
| |
When you gain control of Harry, run or walk forward and a cutscene will take control. Harry will see Cheryl in the distance, through the thick fog. Run straight ahead and into the open alley on the right. A cutscene will occur and direct you to run directly into the alley after Cheryl. Run to the end of the alley, and enter the gate which says "Beware of Dog". You will see the remains of a dog on the other side of the gate. Run past its remains and note the squishing sound beneath Harry's shoes as you step over the bloody mess.
Follow the alley all the way to the end, past the strange camera angle, and go through the gate at the end. Note that the atmosphere becomes darker as you reach this point. Once Harry goes through the gate, a cutscene will occur, and darkness will descend upon you. Harry combats this darkness by lighting a match, which conveniently lights five feet around him. Direct Harry through the alley, past the wheelchair with the creaking, spinning wheel. As you move forward, try to take in everything that you see around you, including the bloody gurney. Listen to the music as it becomes harder and more intense. As you near the end, you will see dismembered bodies, and blood everywhere. Harry will notice a corpse hanging on the fence, and soon after he sees this, small, grey demon children, which are called "Mumblers", will come out of the darkness bearing knives. (In the European and Japanese versions of this game, the Mumblers are replaced with "Claw Fingers", which you will later meet in the game.) Submit to these creatures and let them attack you. You must die in order to proceed -- if you try to run back the way you came, there will be a gate blocking the way. Death is inevitable. |
| ^ |
3. CAFE 5TO2 |
| |
--->>>
Another cutscene. Harry awakes in Cafe 5to2, and meets a police officer from Brahms named Cybil Bennet. Harry describes his situation with his missing daughter, and Cybil says that she has seen no one but Harry in the entire town. Something bizarre is going on, that's all she knows. After some small - talk between the two, Harry gets up to look for Cheryl, but Cybil intervenes and tells him that it's dangerous outside. Harry persists in fear of Cheryl's life. Cybil understands, and hands him a Handgun for protection. Cybil hints that you need to conserve your ammo. You now regain control of Harry.
--->>>
First, go to the counter and pick up the Kitchen Knife and the Health Drink on the opposite side of the pinball machine. Now, move towards the pinball machine. On this side of the counter, there is another Health Drink, a Flashlight, and a Residential Area Map. Note that there is a Save Point -- use it if you need to. Upon turning around, you catch a fleeting glimpse of some sort of creature out of the window of the cafe. I recommend you equip your Handgun.
Try to open the front door to the cafe and attempt to leave. When you do this, a cutscene will begin, and the Pocket Radio laying on one of the tables will begin to emit a static noise. Harry investigates, and the creature that you saw before crashes through the window, which is called an "Air Screamer". Shoot it with your handgun that you equipped earlier. Five or six shots should take it down. Immediately grab the Pocket Radio on the table, and walk out of the cafe.
|
| ^ |
4. OLD SILENT HILL
Part 1: Jeep, Convenience Store, Alley, and Doghouse |
| |
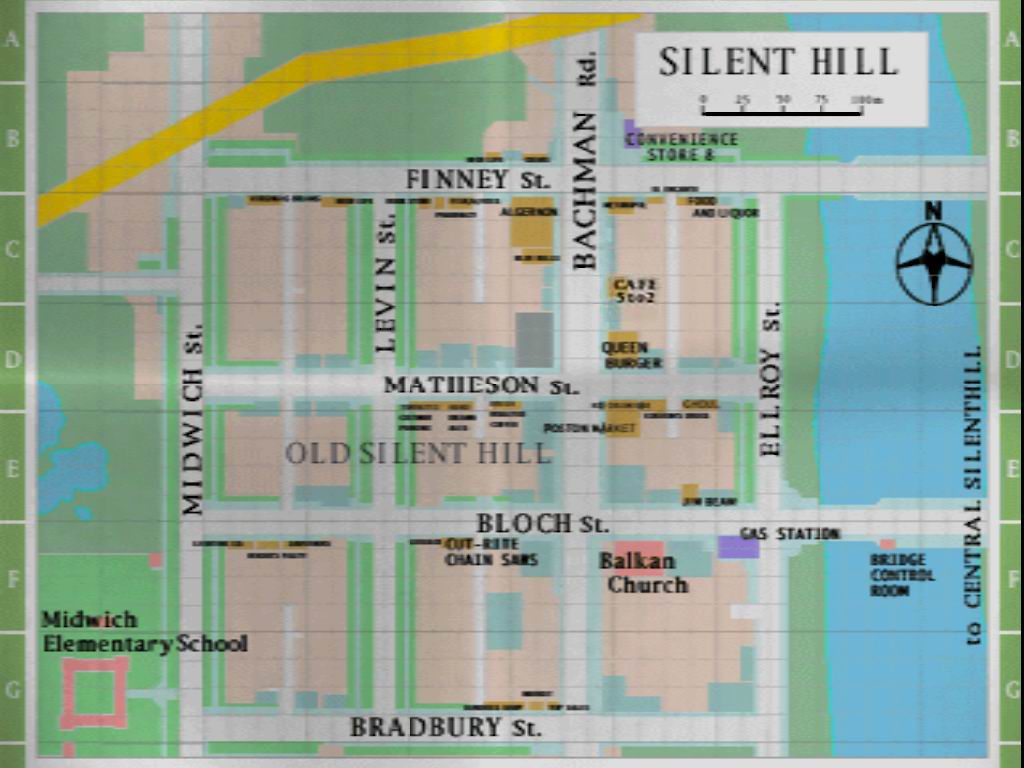
A DETAILED MAP OF OLD SILENT HILL
Harry will note the alley that was in his dream on his Residential Area Map. Note: Harry's crashed vehicle is located at the far North end of Bachman Rd. There, you can find some Health Drinks inside of his Jeep. On the Northeast corner of Bachman and Finney is the Convenience Store, inside you will find three Health Drinks, a First Aid Kit, and a Save Point.
On Next Fear Mode you will find the Channelling Stone on the counter of this convenience store (you just need to beat the game once to unlock it). You can use the Channelling Stone in five different places throughout Silent Hill to achieve the UFO Ending.
From the cafe, head North up Bachman Rd. Grab the Handgun Bullets on the bench in the small alcove to the right of the cafe. Keep heading North up Bachman Rd., then take a left on Finney St. You will encounter some Air Screamers. Remembering Cybil's advice, avoid them and conserve your ammo. Keep running until you reach the alley marked on your map. You will encounter two skinned dogs, or Groaners; you can avoid them easily by running past them and opening the gate. Look familiar?
Make your way to the end of the alley again. This time, after entering the final gate, it will look different. There are Handgun Bullets, and in the crack between the buildings, you will find a Steel Pipe, A Note from Cheryl saying "To school" (Harry will mark down Midwich Elementary School on his Residential Area Map), and Cheryl's sketchbook cover with a funny drawing of Harry on it.
Retrace your way back to the "Beware of Dog" gate (avoiding the Groaners again), and run back to Finney St., taking a left and heading West. Take your next left onto Levin St. You will encounter some more Air Screamers and Groaners, but don't let them distract you as they are easily avoided. Make note of a doghouse on the West side of Levin St. Ignore it for now; take a right onto Matheson St. As you head West, you will notice that the road has been broken away, and there are a few bloody pages (from Cheryl's sketchbook) scattered out on the ground. They indicate some significance to the doghouse on Levin St. "Doghouse - Levin St."
Turn around and head back to Levin St. Go to the doghouse on the West side, and examine the front. You will find a House Key that was hidden in the doghouse. Take it and avoid the Groaners. Note: You will not be able to see the key in the doghouse until you have read the bloody pages at the end of Matheson St.
Head inside the house, and grab the First Aid Kit to your immediate right. There is a locked door in the hall. On Next Fear Mode this door will be unlocked and you can find the Katana in the dojo. In order to unlock the Katana you need to beat the game an indefinite number of times with all of the endings. Go down the hallway and use the Save Point if you need to. Take the Handgun Bullets littered around the house, as well as the Health Drink in the kitchen. Go to the back door and examine the map on the wall. Harry will mark the "Keys for Eclipse" on his map -- these are the keys you need to unlock the back door.
|
| ^ |
5. OLD SILENT HILL
Part 2: Quest for Keys of Eclipse |
| |
Get out of the house and head East on Finney St., avoiding enemies. You will run to the end of this street. There are Air Screamers, especially nearing the end of the street. You will eventually see a police cruiser broken down at the end of the road. Take the Handgun Bullets laying on the ground next to the vehicle (but quickly, to avoid the Air Screamer), and take the Key of "Lion" from the open trunk.
Turn around and head West. Take a left on the next street - Ellroy St. Head down past Matheson St. On the West side of Ellroy St., there is a cliff, and a wooden plank which you can cross. Do so, and examine the bloody mailbox for the Key of "Scarecrow". There is a Health Drink on the stoop. Go back across the wooden plank, and this time, take a left on Matheson St., and then your next right into the alley marked red on your map. Head up this alley until you see a large gate that says "Off Limits" to your left. Go inside, and you will see a basketball hoop with the dismembered head of a Groaner beneath it on the ground. Pick up the Key of "Woodman" next to the head, and the Health Drink on the trash can.
Exit the gate and head left, then take another left onto Finney St. Make your way back to the Levin St. house and enter it. You may want to use the Save Point again. With all three of your keys handy, head to the back door. All three keys will be used, and you will be in the back yard. Darkness will once again descend, and Harry will turn on his Pocket Flashlight. Take the two Health Drinks on the white table, then follow the concrete squares to exit through the back gate.
You will wind up in an alley. Head South -- you will encounter some Groaners, and an Air Screamer will attempt to attack you right away. Turn right onto Matheson St., and then take a quick left onto Midwich St. If you are up for a little trip, go North on Midwich St. for some items -- a Health Drink and some Handgun Bullets. Either way, you will end up heading South towards the Midwich Elementary School, which is marked on your map. Avoid the enemies which become more plentiful the closer you get to the school. Enter the front doors of the school.
|
| ^ |
6. MIDWICH ELEMENTARY SCHOOL
Part 1: Reception |
| |
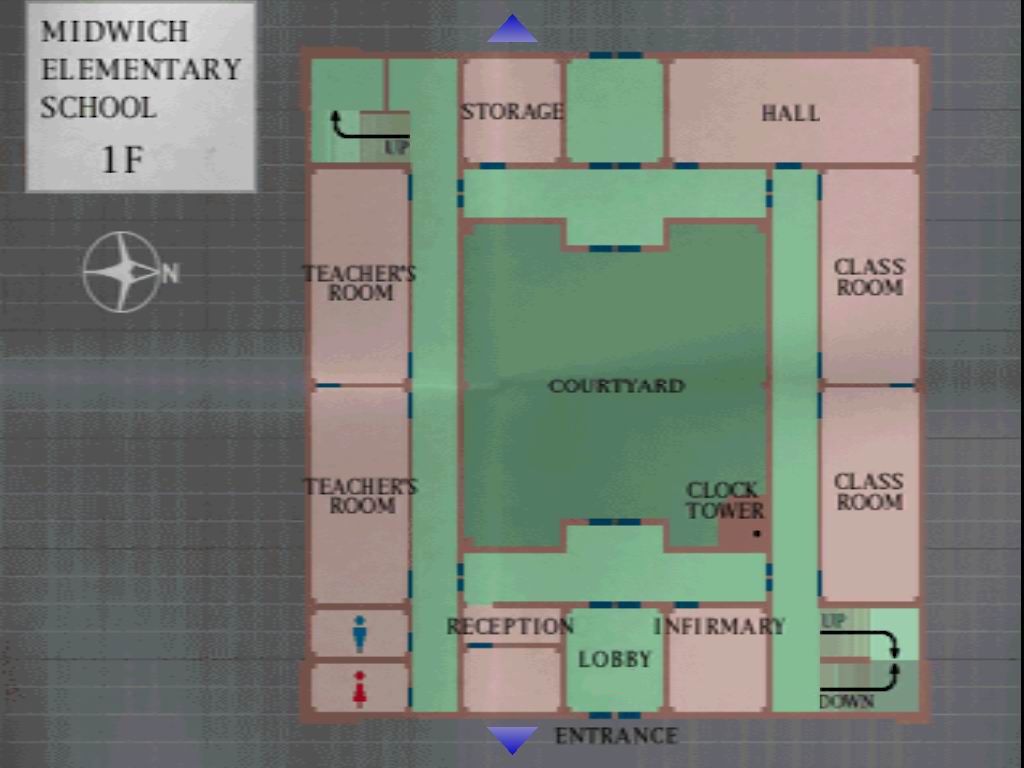
On your left in the lobby, you will find a School Map. Take it and enter the mahogany doors. To your right, there is an Infirmary. Inside, you will find a cabinet with a Health Drink, and you will find a First Aid Kit on the bed. There is also a Save Point, you know what to do. Exit this room, and to your left is a reception area in which you will notice a list of teachers. Inside the reception area, there are some bloody notes.
The first note reads:
10:00
"Alchemy Laboratory"
Gold in an old man's palm.
The future hidden in his fist.
Exchange for sage's water.
The second note reads:
12:00
"A place with songs and sound"
A silver guidepost is
untapped in lost tongues.
Awakening at the ordained order.
The third and last note reads:
5:00
"Darkness that brings the choking heat"
Flames render the silence,
awakening the hungry beast.
Open time's door to beckon prey.
It is pretty clear here that the first thing you must do is find the alchemy laboratory. By examining your School Map, hit up and you will find there is a Lab Equipment Room and a Chemistry Lab on the second floor. This is where you need to go first -- after you enter the door connected to the reception room. There are Handgun Bullets on the coffee table, and a strange painting that you would normally not find in an elementary school.
|
| ^ |
7. MIDWICH ELEMENTARY SCHOOL
Part 2: "Alchemy Laboratory" |
| |
Head out of the reception area and go through the double doors on the opposite side of the hallway. These doors are the only unlocked ones, and the lead to the courtyard. Watch out for the Mumblers (they have a nasty habit of grabbing onto you) and make your way to the double doors on the other side of the courtyard. There are more Mumblers in this hallway. Use your best judgment when shooting enemies. If you go straight into the door ahead (you don't need to), you will encounter a dark apparition of a Mumbler, known as a "Stalker". You will see many of these throughout the game, and they are harmless, but there may be other dangerous enemies around them. In this room, you will find some Handgun Bullets straight ahead on the bench.
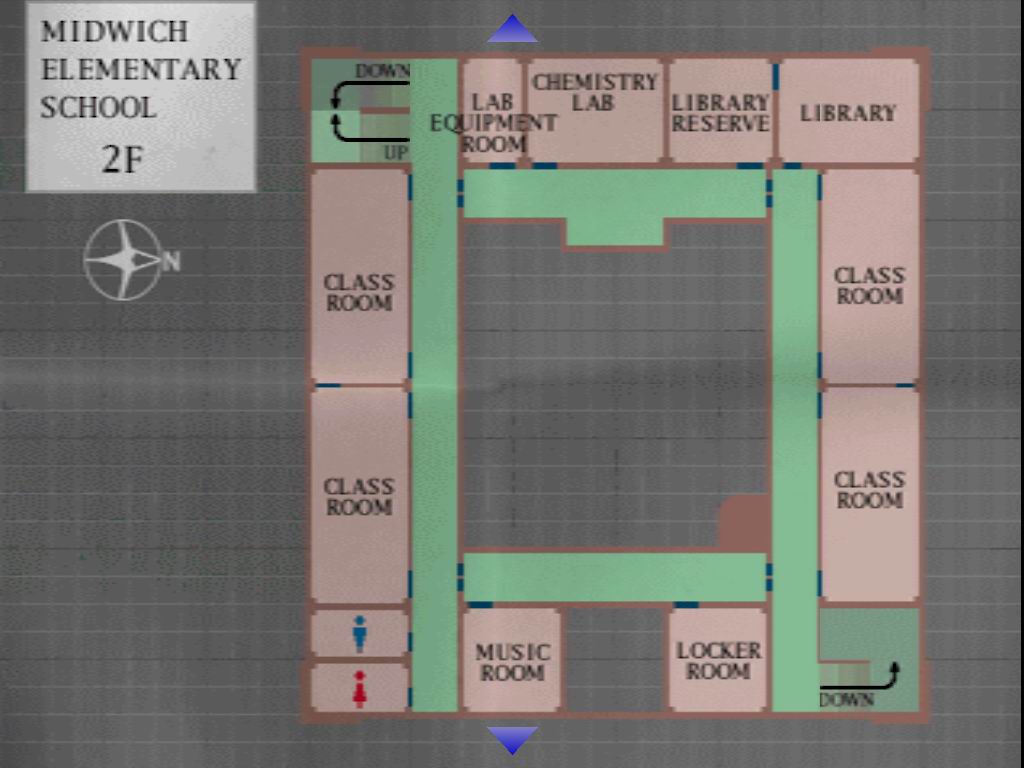
Go through the door by the Storage Room (South). Go up the stairs to the second floor. Try not to enter any of the classrooms or the Girls' Bathroom, as there are usually multiple Mumblers and little ammo or health to make up for it. If you go into the Boys' Bathroom, you will hear crying. Unlock the double doors on the opposite side of the stairs (West). Enter these doors, and then take your next left into the Lab Equipment Room.
The music grows intense as you enter this room. On a far shelf, grab the Chemical in a purple bottle. Exit the room and take a left into the next room -- the Chemistry Lab. Use the Chemical on the left hand. After the hand corrodes, grab the Gold Medallion off of the table. You now need to direct Harry back downstairs into the Courtyard.
Once in the Courtyard, avoid the Mumblers and head to the Northeast where you will find a Clock Tower. If you examine the Clock Tower, you will notice that the hands are stopped at 10:00, and on either side, there are gold and silver indentations. Insert your Gold Medallion into the gold indentation (whose plate reads "A Golden Sun"). The sound of a mechanism will sound, and you are then informed that the hands of the clock are stopped at 12:00.
|
| ^ |
8. MIDWICH ELEMENTARY SCHOOL
Part 3: "A Place With Songs and Sound" |
| |
Head back up to the second floor. This time, enter the double doors opposite of the bathrooms (East). If you would like to, enter the Locker Room. You will hear a rattling noise -- follow the noise and investigate. Seems it was just a cat. You will hear a disturbing sound, and a Mumbler will be waiting for you on the other side of the door. Enter the Music Room. You will notice that the piano is uncovered, and there are blood stains on the keys. To the left of the piano on the chalkboard, there is a musical score. On it, written in blood, is the "Tale of Birds Without a Voice". It reads:
First flew the greedy Pelican,
Eager for the reward,
White wings flailing.
Then came a silent Dove,
Flying beyond the Pelican,
As far as he could.
A Raven flies in,
Flying higher than the Dove,
Just to show that he can.
A Swan glides in,
To find a peaceful spot,
Next to another bird.
Finally out comes a Crow,
Coming quickly to a stop,
Yawning and then napping.
Who will show the way,
Who will be the key,
Who will lead to
The silver reward.
Go back to the piano. Using the bloody note as a reference, hit the five silent keys in this order:
(If you hear a note play, then you did something wrong and you need to start all over again.)
2nd white key from left (D)
2nd white key from right (A)
1st black key from right (A#)
3rd white key from right (G)
1st black key from left (C#)
After you complete the puzzle, a Silver Medallion will fall from above the chalkboard. Grab it and head back to the Courtyard's clock tower on the first floor. Insert the Silver Medallion into the silver indentation, whose plate reads "A Silver Moon". You hear more mechanisms moving, and the music becomes more intense. The hands of the clock read 5:00. |
| ^ |
9. MIDWICH ELEMENTARY SCHOOL
Part 4: "Darkness that Brings the Choking Heat" |
| |
You will need to head back up to the second floor. Exiting the staircase, enter the double doors across the hall, and run through the hallway to the next set of double doors. Notice that the Library Reserve is locked and cannot be accessed quite yet. If you enter the Library (you don't have to), a First Aid Kit can be found to your immediate right. There are three Stalkers hiding playfully behind the first bookshelf. Do not enter the classrooms. There is a Stalker and two Mumblers in the hallway. Go down the staircase at the Northeast end of the school and into the basement.

There will be doors on both the right and left of the staircase. Enter the door on the right into the Boiler Room. Press the obnoxiously large red glowing switch on the boiler. You will then hear a growling sound. Exit this room and head back up the stairs and head into the Courtyard again. Go to the clock tower and enter the small door. Harry will climb down the rungs. Run across and climb up the other side.
|
| ^ |
10. ALTERNATE MIDWICH ELEMENTARY |
| |
As you exit the clock tower, a cutscene will occur. Harry asks where he is, even though it is painfully obvious where he is. You see a large mark etched into the ground. Move on and enter the Western doors (across from the clock tower). You will encounter some Mumblers. If you direct Harry straight ahead and enter the unnamed room, you will find a large turning fan with lots of blood and guts caked all around it. Looks like someone had fun. There is a First Aid Kit as well as some Handgun Bullets on either bench. Exit the room and enter the Storage Room.
Oddly enough, you need to grab the neon pink Rubber Ball. Exit the Storage Room, and enter the room marked "Hall" (to avoid confusion). Run right and go through the first door you see, avoiding the Creepers, another new enemy. After exiting, take an immediate left into a Classroom. In this room, you will find, among other scattered playing cards, a Picture Card. Grab it and go through the door on the other side which leads into the next classroom. You want to exit the classroom immediately as there are Mumblers waiting to stab you. Grab the Health Drink on the bench. Enter the Northeast double doors (they are near a locked gate at the end of the hallway).
More Mumblers, what were you expecting? If you enter the Infirmary (you don't need to), you can pick up a Health Drink and a First Aid Kit. There is also a Save Point; use it. The Lobby has two Mumblers inside -- there's no point in going in there. Enter the Reception Area and go through the door. As you can see, the painting from the "normal" Midwich Elementary School has become reality in the Alternate Midwich Elementary School. Grab the Handgun Bullets on the extremely uncomfortable-looking couch, then go to the door with the three square holes. Use your Picture Card to unlock it and then enter it.
Entering the Girls' Restroom acts as a portal to the second floor. Enter and exit the Girls' Restroom, then enter the Boys' Restroom for a lot of Handgun Bullets and some Shotgun Shells. You will need to enter and exit the Girls' Restroom again to make it back to the first floor (a large gate blocks the way anyhow). Enter the Boys' Restroom back on the first floor and examine the stall. The door will creak open, revealing a striking image of hanging corpse -- its head is turned toward you. Be courageous and walk inside to grab the Shotgun on the left. Don't forget to read the bloody message on the right:
"Leonard Rhine
The Monster Lurks"
Exit the bathroom and run to the end of the hallway where a gate blocks the way (West). Enter the Teacher's Room. Run straight and to the door on the right -- you are now in the second Teacher's Room where Handgun Bullets await you on a chair. There are three unconnected blue telephones laying haphazardly on the table; try to leave the room through the door at the other end. When you attempt to do so, one of the phones will ring. Harry moves to pick it up and hears Cheryl's pleading voice on the other end, begging for help. The phone then goes dead, leaving Harry more worried about Cheryl than before. You can now exit the Teacher's Lounge.

Go up the staircases to the Roof. On the far end of the roof, you will find a red valve and a drainage system. Note that at the other end of the drainage system, there is blood dripping near a drainage pipe. You need to examine this hole, and find that there is a Hanging Key, just out of your reach. Direct Harry to the corner of the drainage system, where there is another drainage pipe/hole. You need to put your Rubber Ball into the hole, and then turn the red valve to release a stream of water which will flush the key down to the courtyard. If you do not put the Rubber Ball in the hole, the water will not reach the Key.
If you are on Next Fear Mode, you can use the Channelling Stone on the roof, this is the first out of five places to use it in order to get the UFO Ending.
Head back downstairs to the first floor and unlock the blue double doors, then go right, into the Courtyard. The key you just flushed down is located on the Northwestern end of the Courtyard underneath a pipe in a pool of water. Go retrieve the Classroom Key. Make your way back into the school, and go to the second floor. If you continue straight ahead, there is a Health Drink to the left, on a bench. In order to progress down the hall, direct Harry into the Classroom, and use the connecting door to go to the second Classroom as quickly as possible to avoid Mumbler attacks. This room is free of enemies, and there are some Shotgun Shells on a bloody chair. Exit this room and watch out for the Mumblers and Creepers. Enter the blue double doors in front of you.
There are a few more Creepers and a Mumbler in this hallway. Avoid them and enter the Locker Room. You again hear the locker rattling, perhaps this time it is not a cat. Make your way around the lockers, and you will notice the same locker is dripping blood (and moving again). Examine it, and Harry will open it to find that there is nothing inside, save for blood -- everywhere. When you try to exit the room, a corpse will fall from one of the lockers, along with a key. Grab the Library Reserve Key on the floor. You can now exit the Locker Room.
You need to make your way to the Library Reserve, back through the conjoined classrooms. Watch out for enemies on your way there. Use your Library Reserve Key to open the Library Reserve (imagine that). Take a look at the freaking huge shelf. Pick up the First Aid Kit. Notice the persistent knocking - I wonder who that could be? If you read the bloody note on the stall in the Boys' Restroom, then you will be able to read the book on the shelf entitled "The Monster Lurks".
Chapter 3: "Manifestation of Delusions"
...Poltergeists are among these. Negative emotions, like fear, worry or stress manifest into external energy with physical effects. Nightmares have, in some cases, been shown to trigger them. However, such phenomena do not appear to happen to just anyone. Although it's not clear why, adolescents, especially girls, are prone to such occurrences.
From the Library Reserve, enter the Library. In this room you will find some Handgun Bullets and an open book -- examine it.
Hearing this, the hunter armed with bow and arrow said, "I will kill the lizard." But upon meeting his opponent, he held back, taunting, "Who's afraid of a reptile?" At this, the furious lizard hissed, "I'll swallow you up in a single bite!" Then the huge creature attacked, jaws opened wide. This was what the man wanted. Calmly drawing his bow, he shot into the lizard's gaping mouth. Effortlessly, the arrow flew, piercing the defenseless maw, and the lizard fell down dead.
Exit the Library, and you will find that there is another barrier blocking you from the most obvious route. Enter the Classroom nearest the Library as the other door is locked and cannot be opened. Use the Classroom Key. There are three Mumblers in this room -- run past them and go through the door leading into the next Classroom. Here, you will find a Health Drink on a chair. Exit the room and you will find another Health Drink on a bench, and a series of Creepers will come after Harry.
Run forward and take the stairs to the left, leading to the first floor. You can now unlock the fenced door. It may be necessary to head to the Infirmary from this point to Save. Head down the second set of descending stairs. You are in the basement again, along with some hanging corpses. Enter the door on the left - the Storage Room. Pick up the two Shotgun Shells and the Ampoule. Save the Ampoule for when you need it -- it protects against any damage for a limited amount of time. Ampoules are good for areas where you know you are going to be taking a lot of damage, in a quick succession.
Exit the Storage Room and enter the Boiler Room once more, at the other end. There are two red valves -- one on the left and one on the right. It is crucial to turn these in the correct order. There are rotating spikes on both the left and right sides which are blocking access to the area ahead, and are controlled by the red valves. The left valve will turn the left spikes twice, while turning the right spikes once. The right valve will do the opposite.
Turn the left valve once to the right, then turn the right valve twice to the left.
|
| |
>>> LIZARD BOSS <<< |
| |
Once the spikes have been cleared out of the way, Harry can move forward, and an elevator will take you down even further. A cutscene will occur in a large room. The floor is made of grating, and there are rotating spikes around a burning corpse. On the other side of the fire, the lizard from the fairy tale awaits Harry. Strafe while running around the center mechanism, shooting the lizard with your handgun. When the lizard stops and saliva dribbles from its mouth, you need to switch to your shotgun. Stop and wait for the lizard to come to you. When it bumps you, then opens its jaws to eat you, press square and back to do a backwards jump to ensure that you will not be gobbled up, and blast your shotgun directly at its gaping maw. Do this twice, and it the lizard should die. You will hear sirens in the distance, and the screen will fade to black. |
| |
>>> - - - <<< |
| |
You see a young girl in an old-fashioned dress with a white collar in the Boiler Room. As soon as she notices Harry, she fades away -- like a ghost. Where she was standing is now a key -- directly under that huge red button. Pick up the K. Gordon Key. Head out of the Boiler Room and up the stairs. It is now daytime again, and Harry will notice the church bells ringing. He marks the Balkan Church on his map.
Unlock the double doors leading to the Reception Area. Recheck the list of teachers, and Harry will notice that K. Gordon is a teacher. He marks the address of the teacher's home down on his map. Unlock the doors to the lobby, and then unlock the main entrance doors to exit the Midwich Elementary School.
|
| ^ |
11. TO BALKIN CHURCH |
| |
A DETAILED MAP OF OLD SILENT HILL
As soon as you exit the school, you will notice it is very foggy and it is snowing. Run to the right of the school and head South to enter the School Bus. Inside is a Save Point and two Health Drinks. Exit the School Bus. Head East down Bradbury St. and take the first left into an alley. The camera angle will change, and there is a Groaner waiting for you next to a bloody garage. Take a right into a wooden gate and use the K. Gordon Key on the back door to the house.
Take the Handgun Bullets littered about the house and go through the front door. Take a right down Levin St. and take a left onto Bradbury St. On the right side (North) of Bradbury St., on the second green bench , there is a Health Drink. After passing that bench, take a left into the alley, and pick up the Handgun Bullets next to the pile of black garbage bags. Follow the alley all the way up (North) to Bloch St. and take a right (East). Head straight to the Balkan Church from here and enter its elaborately carved wooden doors.
On Next Fear Mode, if you head west on Bloch Street you will find a smashed window of Cut-Rite Chainsaws. Inside you will find the Chainsaw. You will need the Gasoline to power it and take it, but if you beat the game an indefinite number of times you can take it without the Gasoline.
--->>>
The camera pans down over a grotesquely accurate crucifix, showing an older, strangely-dressed lady. She tells Harry that she was expecting him -- it was foretold by gyromancy. She mentions Cheryl, Harry's daughter, and she tells him to follow the path of the hermit, concealed by Flauros, a cage of peace. It can break through the walls of darkness and counteract the wrath of the underworld. She tells Harry to quickly go to the hospital and disappears. If you try to follow her, the door she went through will be locked from the other side.
--->>>
Take the "Flauros" and the Drawbridge Key on the altar. There is also a Health Drink to the left, and a Save Point near the front doors. Exit the building.
|
| ^ |
12. TO ALCHEMILLA HOSPITAL |
| |
Take a right (East) after exiting the Balkan Church. You will come across Hell Gas Station, a Groaner prowling faithfully outside. Enter the open door. There is a Save Point in here, as well as some Handgun Bullets. On Next Fear Mode, you will see a container of Gasoline, which you will need to fuel the Chainsaw or the Rock Drill. Continue heading right (East) down Bloch St., and you will come to the Drawbridge Station on Harry's right (South). On Next Fear Mode, if you enter the door at the bottom of this station, you will find the Rock Drill. You will need the Gasoline to fuel this, but if you beat the game an indefinite number of times you can pick this weapon up without it. Go up the stairs to the drawbridge station and enter the door. Here you will find a Save Point, a Shopping District Map, and a Health Drink. There is a control panel into which you need to insert your Drawbridge Key in order to lower the drawbridge and get access to Central Silent Hill. Exit the Drawbridge Station and make your way across the drawbridge.

A DETAILED MAP OF CENTRAL SILENT HILL
Ttake a right onto Crichton St. and head down (South) toward Alchemilla Hospital. The hospital entrance is located on Koontz St. Enter the gate and watch out for the Groaners. You will hear some muffles gunshots outside the entrance gates of the hospital. Now, you can enter the main doors.
|
| ^ |
13. ALCHEMILLA HOSPITAL |
| |
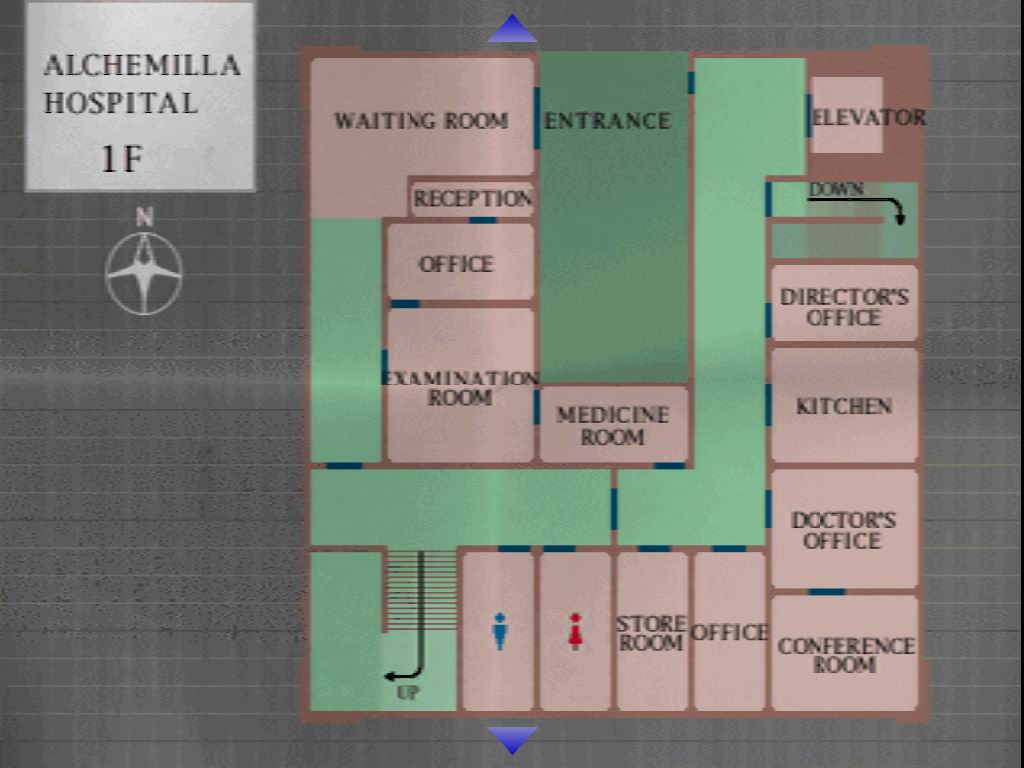
There is a Save Point on the Reception Counter. Head into the open hallway and you will hear a gunshot. Continue down the hallway until you reach the first door on the left, and enter it.
--->>>
A cutscene will occur, and you will see Dr. Michael Kaufmann sitting in a chair, with a handgun, over a dead Air Screamer. Harry enters the room, and Dr. Kaufmann shoots at him, not knowing if Harry is friend or foe. Kaufmann tells Harry that he was taking a nap, and when he awoke, everyone had disappeared and monsters had taken their place. Harry asks Dr. Kaufmann if he's seen Cheryl. Dr. Kaufmann apologizes without remorse and implies that Cheryl is probably not alive. Kaufmann suddenly needs to leave, and Harry wishes him good luck.
--->>>
Enter the door by the blue cabinet. Cross the room and enter the door opposite the desk. There is a First Aid Kit to the right, and there is a Hospital Map to the left on the wall. Take these and go back to Dr. Kaufmann's office. Go through the door next to the beds, and at the end of this room you will find a newspaper with an article clipped out on a desk. Enter the door opposite the desk. Enter the Doctor's Office to your left. On a counter, there is a Hospital Basement Map. Go through the other door, leading to the Conference Room. Pick up the Basement Key on the other side of the marble conference table. Leave the room and go back out into the hallway.
Go into the next door down the hall – the Kitchen. Pick up the Plastic Bottle in the back of the room, as well as the Health Drink. Leave the Kitchen and go into the next room over – the Director's Office. This happens to be Kaufmann's office. It looks like someone was searching the room for something. There are books scattered all over the ground and there is a broken vial of red liquid at the back of the room. Use the Plastic Bottle to pick up the Unknown Liquid. Leave the room.
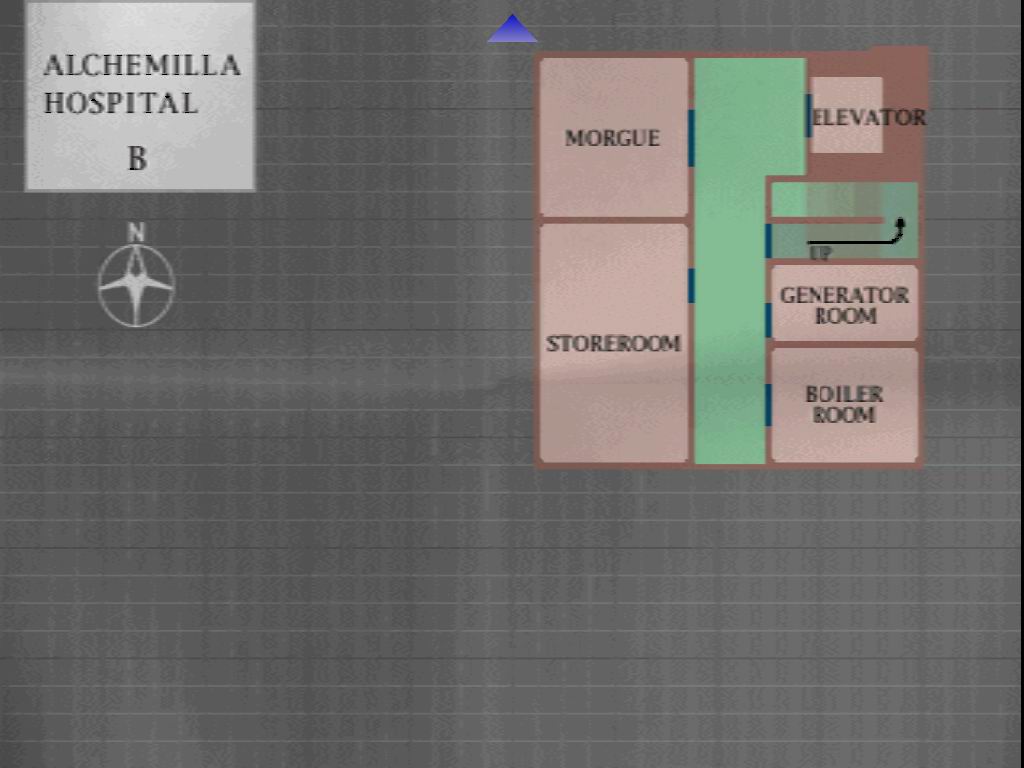
Since the elevator at the end of the hall doesn't appear to be working, take the next door down the hall, leading to the basement. Go down the stairs and enter the door at the end. Use the circle button to turn on your flashlight and dispose of the Creepers. Enter the Generator Room and examine the generator. Press the switch to turn on the generator and power the elevator. Exit the room. All of the other doors in the basement are locked or jammed. Go into the elevator and take it to the second floor. The door in this room will be jammed, but make sure you try to open it. Get back in the elevator and take it to the third floor. Again, this door is jammed, but make sure you try to open it. This leaves you questioning where to go next. Enter the elevator.
When you examine the elevator panel this time, a fourth floor has mysteriously appeared. Take the elevator up to the fourth floor and a cutscene will occur. It is of Alessa walking into the Green Lion Antiques shop, which you will visit later on. You are being transported to the Alternate Alchemilla Hospital. Enter the the double doors.
|
| ^ |
14. ALTERNATE ALCHEMILLA HOSPITAL |
| |
As you walk away, you will hear the doors lock behind you. Every door in this hallway is jammed – just continue forward into the next set of double doors. It will now be dark, and Harry will automatically turn on his flashlight. The door will again lock behind you. Head down the stairs and enter the double doors leading to the third floor. Watch out for Possessed Nurses. Go into the Mens' Restroom. At the end you will find the Plate of “Turtle”.
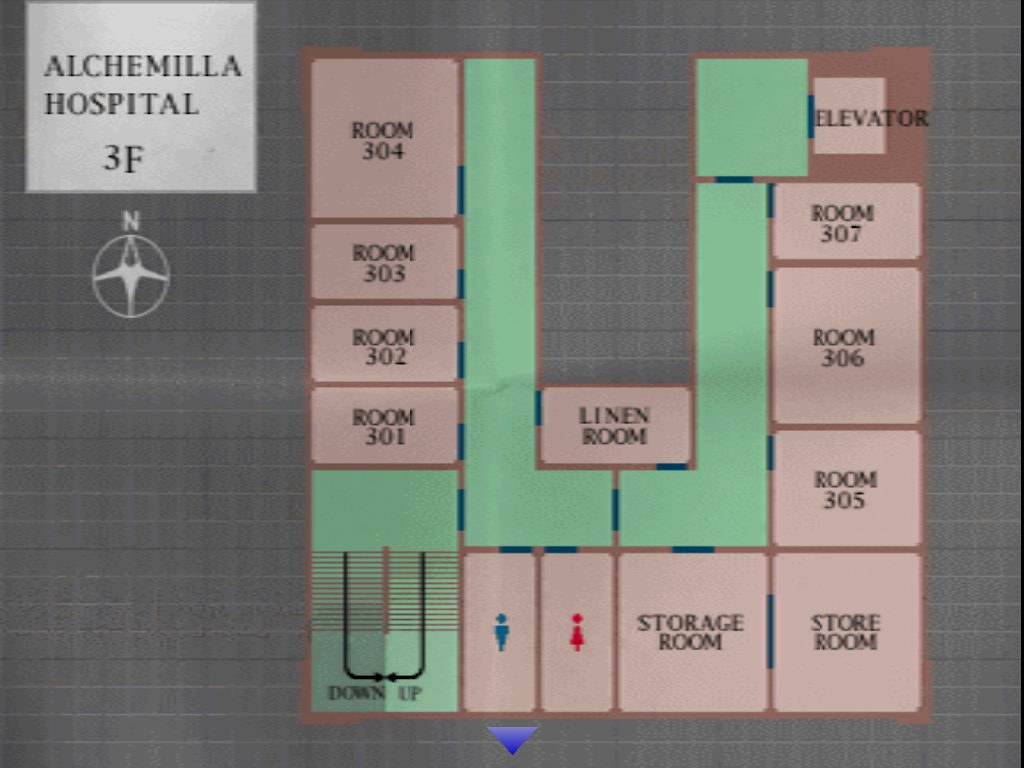
Exit the Mens' Restroom and go right into the double doors leading into the East section of the hospital. Enter the Storage Room on the left and take the First Aid Kit, Handgun Bullets, and Blood Pack on the shelf. Exit the Storage Room and beware of the two Possessed Nurses in this area. Enter Room 306 to the right, and take the Plate of “Cat” off the wall in the back of the room. Exit the room and unlock the double doors at the end of the hallway, but do not enter them – it may make for easy access later.
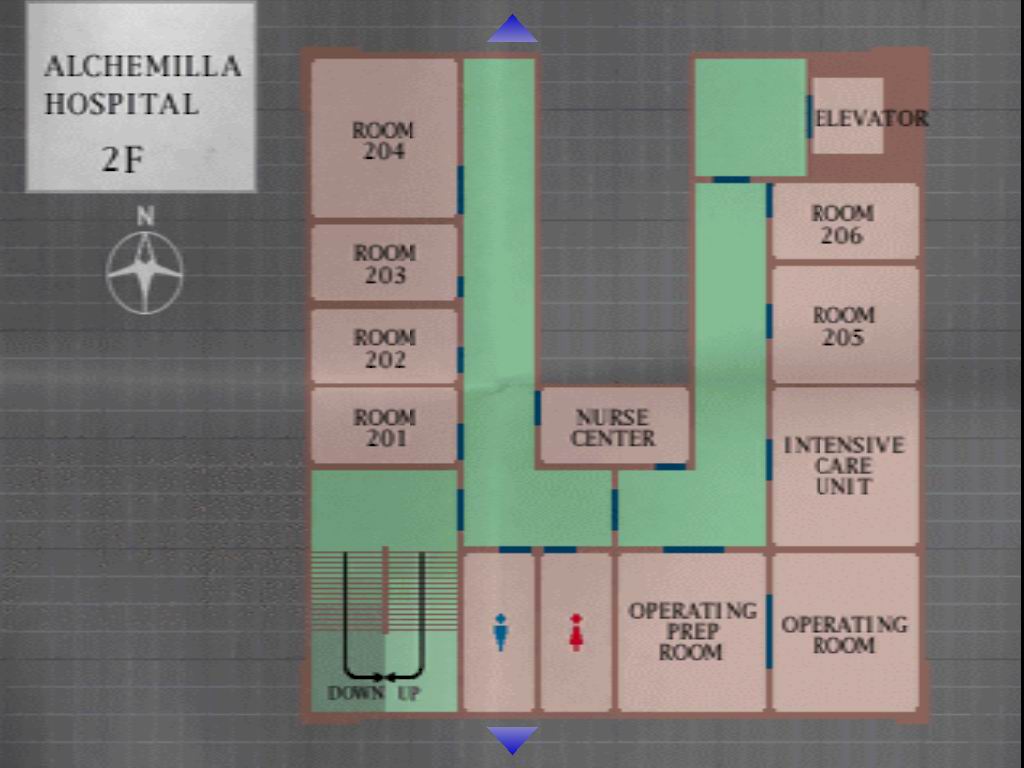
Go back to the staircase and take the stairs down to the second floor. Beware of the Possessed Nurse as you enter the second floor's double doors. Enter Room 201, the next door to the left. Inside you will be trapped with a Possessed Nurse. Immediately dispose of it, and take the Lighter off of the bloodstained bed in the back. Exit the room.
Enter room 204 at the end of the West hallway. In the back of the room, there are some tentacles feeding off of a pool of blood, and there is a green plate behind them. Use the Blood Pack to distract the tentacles from sucking your blood. Walk around them and take the Plate of “Hatter” off the wall. Take the staircase down to the first floor. There will be a Possessed Doctor waiting for you at the end of the staircase. Ignore him and run into the double doors on the right.
Go through the next doors straight ahead.
Another Possessed Doctor will be there to greet you. Either kill him or run past him – use your best judgment. Enter the second door on the right, the office, and take the Handgun Bullets. Exit the room. Do not bother entering the kitchen, as there is only a Possessed Doctor and a Health Drink in an enclosed space.
Enter the Director's Office. Here, you will find the last plate you will need – the Plate of “Queen”. There is a Save Point. Exit the room and there will be a Possessed Doctor waiting for you. Run to the far North end of the hall toward the elevator. Take three Health Drinks out of the broken vending machine. Go back to the Southwest staircase on the first floor – take it up to the second floor.
Enter the door leading into the Nurse Center. Read the scribbled sketchbook page stuck to the wall.
Clouds flowing over a hill.
Sky on a sunny day.
Tangerines that are bitter.
Lucky four-leaf clover.
Violets in the garden.
Dandelions along a path.
Unavoidable sleeping time.
Liquid flowing from a slashed wrist.
The poem is referring to colors. From the top, going clockwise, it should be:
(White, Blue, Orange, Green, Purple, Yellow, Black, Red)
Put the plates in the correct order, going clockwise from the top (Turtle, Hatter, Cat, Queen). You will hear the door unlock; enter it. Watch out for the Possessed Nurses. Enter the door directly in front of you – the Operating Prep Room. There are two Possessed Nurses in this room. Take them out and enter the Operating Room.
There is yet another Possessed Nurse in here. Take her out and grab the Basement Storeroom Key on the gurney at the back of the room. Exit the rooms and go back to the hallway. Enter the Intensive Care Unit and take the Disinfecting Alcohol off the gurney and ignore the Possessed Nurse behind it. Exit the room.
Watch out for the Possessed Nurses in the hallway. If you would like to pick up a First Aid Kit, enter room 206. It is on a chair at the back of the room. Otherwise, unlock the double doors to the far North, but this time, enter them. Take the elevator down to the basement.
Once you are in the basement, enter the Generator Room to grab the Emergency Hammer. Leave, and use the Basement Storeroom Key on the Storeroom door and enter. Inside, you will find some Shotgun Shells and Handgun Bullets. There is a shelf at the back of the room. Go to the right side and push the cabinet. This will reveal a hidden door in which you must enter.
You will notice a large grate in the center of the room which is covered in vines, preventing you from lifting it up. Use your Disinfecting Alcohol and Harry will pour it over the vines. Then, use the Lighter, and the alcohol will burn the vines away. The door will open, allowing you access to a long hallway. Enter the door at the end.
This part may be pretty intense, because it is dark, cramped, and FILLED with Possessed Nurses. To make matters worse, you do not have a map for this place. Enter the first door on the left, then enter the first door on the right. There is a Possessed Nurse in here. Take her out, and then pick up the Video Tape on the gurney. Leave this room and turn right – enter the last room on the left. This is Alessa's hospital room. Harry will notice a picture of her on some equipment, alongside an Examination Room Key. Exit the room and head all the way back to the elevator in the basement.
You have a choice from here. You can head up to the third floor and go into room 302 on the West wing of the hospital to watch the Video Tape, or you can simply skip it and go to the first floor, and enter the Medicine Room. If you choose to watch the Video Tape, some secrets will be unraveled about Lisa Garland and her work at the hospital, though it is distorted and difficult to make out. There are also Shotgun Shells on the bed, and a Save Point on a gurney in room 302.
Once at the Medicine Room, you will encounter a Possessed Doctor. Go to the back of the room and use the Examination Room Key and enter the door.
--->>>
You will encounter a cutscene. Lisa is hiding under a desk, and comes out, happy to see Harry. She hugs him, although she doesn't know him. They exchange names, and Lisa describes a similar situation to that of Dr. Kaufmann. Harry asks about his daughter, Cheryl, again. Lisa says she has not seen her, since she was unconscious the whole time. Harry asks about the weird stuff in the basement, and Lisa says that she is under strict orders to never enter the basement Storeroom. Harry starts to hear sirens and grabs his head in pain, then slowly blacks out.
Harry is sitting on a hospital bed and wondering what happened. Dahlia, the lady from the Balkan Church, enters the room and introduces her name this time. She tells Harry that the town is being devoured by darkness. Harry doesn't understand what Dahlia is saying, and she tells him that he needs to go to the Other Church. Dahlia mentions the crest marked on the ground all over Silent Hill, and tells him it is the Mark of Samael. Dahlia tells Harry to stop the mark from being completed, and she leaves the room in a rush.
--->>>
Grab the Antique Shop Key that Dahlia has left you off the desk. Exit the room and go to the reception area. Use the Save Point. Exit the hospital.
|
| ^ |
15. GREEN LION ANTIQUES |
| |
A DETAILED MAP OF CENTRAL SILENT HILL
Take a left onto Koontz St., and then take a right onto Crichton St. and head North. Take a right onto Sagan St., and then your next right into the Police Station. Once inside, pick up the two Handgun Bullets and the Shotgun Shells. Go through the only useable door. Inside this small office, you will find some more Handgun Bullets, Shotgun Shells and a Save Point. A memo on the desk will read:
Coroner Seals called. Officer Gucci is unlikely to be murdered. He apparently died naturally. But, medical records show Officer Gucci had no prior symptoms of heart disease.
Examine the chalkboard. There's something on it:
Product only available in selected areas of Silent Hill.
Raw material is White Claudia, a plant peculiar to the region. Manufactured here? Dealer = manufacturer?
Exit the Police Station.
Head left (East) down Sagan St. until you hit Simmons St. and take a left (North). Go all the way up the road until you hit the Green Lion Antique Shop on the right. Head through the open door, and down the stairs. Harry will use the Antique Shop Key on the door at the end. Go through this door.
It will be dark; hit circle to turn on your flashlight. You will see a Save Point up on a dresser. Head to the back of the room where you will find a cabinet with a trace on the floor that somebody moved the cabinet – push it and a cutscene will occur.
--->>>
Cybil will walk in, and tells Harry that she's glad he's okay. She realizes things were worse than she thought. Harry thought Cybil left town, but she saw Harry go into the shop, so she followed him. Cybil expresses that it's impossible to leave Silent Hill. Harry asks about his daughter, Cheryl, again, and Cybil says she caught a glimpse of Cheryl through the fog on Bachman Rd., headed towards Toluca Lake. Cybil says it was like she was walking on thin air.
Harry asks Cybil if she knows of Dahlia Gillespie. She says she doesn't, but Harry lets her know all the gibberish Dahlia's filling his head with. Cybil says that Dahlia must be on drugs. Harry wonders what drug trafficking could do with the way Silent Hill is. Harry mentions the alternate, nightmarish world he had been experiencing, but Cybil doesn't understand. Cybil examines the hole in the wall, and Harry decides to check it out.
--->>>
Head straight, through the long corridor, and into the other hole at the end. Harry will notice the altar in the back of the room – could this be the “Other Church” Dahlia was talking about? Grab the Axe from the wall. Try to go back through the hole in the wall and another cutscene will occur.
--->>>
Flames from the altar will rise and roar, devouring the room in a demonic glow. Cybil goes in after Harry, and notices that he went “missing” -- he has been transported to the alternate Silent Hill once more.
Harry wakes up in the alternate Alchemilla Hospital on a bed, with Lisa sitting in front of him. Lisa speaks of Dahlia, and her child, Alessa. She also speaks of the fire incident – Harry pries Lisa for more clues. Lisa says before Silent Hill turned into a resort, the residents were on the quiet side, and believed in an occult religion. When the resort area became a part of Silent Hill, everyone “clammed up” about the strange goings-on in Silent Hill.
--->>>
|
| ^ |
16. ALTERNATE CENTRAL SILENT HILL
Part 1: Silent Hill Town Center |
| |
A DETAILED MAP OF CENTRAL SILENT HILL (ALTERNATE)
Oddly enough, Harry wakes up once more in the Green Lion Antique Shop, but it is dark and “alternate” once more. Harry recalls Cybil saying Cheryl was headed towards the lake, so he decides to go in that direction.
Use the Save Point in this room and exit the shop. Go up the stairs and take a left out of the Antique Shop. Go towards the Silent Hill Town Center on the map, and avoid the ape-like creatures, “Rompers”.
As you head towards the Silent Hill Town Center, you will find that a hole has been cut open in a fence – enter this hole. You will see that it is a shopping mall with grating on the floor – there is an escalator as well. When you attempt to head up the escalator, a cutscene will occur, showing Harry his daughter Cheryl on multiple television screens, in distress.
Head up the escalators and go left. Enter the first door on the left right before the bench. Take the two Rifle Shells, the First Aid Kit in the back, and use the Save Point. Exit this room and take a left. When you pass the bench, the grating platform will drop down and the Larva Boss will make its appearance. The Hunting Rifle will be straight ahead of you to pick up and use. Equip it.
|
| |
>>>LARVA BOSS<<< |
| |
The best way to deal with the Larva Boss is to run and strafe to avoid its attacks, while stopping momentarily to shoot it a couple times in the head. It will come up from the ground, then back down again after it attacks. A really good technique it to strafe around the area you dropped down, where the grated platform is. When the Larva attacks, avoid the green ball it shoots, then stop on the grated area and give it a good two to three shots. The Larva cannot go into the ground as the grated platform is blocking the way. Avoid the attacks and get in eight to ten shots with the Hunting Rifle and the creature will shriek, then go underground. Moments later it will rise out of the ground to crash through the glass door, creating an exit for Harry. Leave the area. |
| ^ |
17. ALTERNATE CENTRAL SILENT HILL
Part 2: Back to Alchemilla Hospital |
| |
A DETAILED MAP OF CENTRAL SILENT HILL (ALTERNATE)
Once out of the Silent Hill Town Center, run right, avoiding the darker versions of the Air Screamers – the “Night Flutters”. Run straight and soon the concrete will turn into grating. You will see windmills on either side. Run to the right and continue straight. You are now on Sagan St. of the alternate Central Silent Hill.
Continue heading West on Sagan St. until you reach the Police Station, and go inside. Pick up the Rifle Shells and Handgun Bullets. You may want to use the Save Point again. Leave the Police Station. Run straight ahead and onto Crichton St. Head South back to Alchemilla Hospital on Koontz St. and enter the front gates. There will be three of the dark Groaners which are called “Wormheads”. Avoid them and go through the front doors. Head to the left around the reception desk and into the Examination Room, where a cutscene will occur.
--->>>
Harry and Lisa both express happiness to see that they were both okay. Harry still wants to go to the lake to find Cheryl, but the road is blocked off. Lisa remembers a way through the waterworks and expresses that she is afraid to be alone but cannot leave the hospital, so Harry goes on without her. He promises he will be back.
--->>>
Try to enter the room again and Lisa is mysteriously gone. Exit the hospital.
If you are playing on Next Fear Mode, you can use the Channeling Stone. This is the second out of five places you can use it to achieve the UFO Ending.
Exit the gates and head straight and up the staircase in between the two buildings. A cutscene will occur and Harry will walk up to the roof. A giant Moth will appear, shooting a blast of venom at Harry.
|
| |
>>>MOTH BOSS<<< |
| |
If you still have sufficient ammo for the Hunting Rifle, use it. Otherwise, use the Shotgun. Strafing works well here too, mixed with running. Watch the Moth's attacks. When it tries to use its abdomen to attack you, dodge it and fire a quick bullet or two. You may want to use an Ampoule here if you don't feel like running around or using very much strategy. You can go onto the upper level to fight the boss, but there is not much room to run around so it is not recommended. If you stick to the stairs, you can avoid the abdomen attack entirely, making it easy to pump the moth full of bullets faster. After you defeat the Moth, you will notice Silent Hill is once again normal. Run back down the stairs. |
| |
>>> --- <<< |
| |
Turn right onto Crichton St. and head back to Old Silent Hill, going West on Sagan St. Once you reach the drawbridge, Harry will automatically be transported to the Waterworks by Midwich Elementary School to avoid too much repetition. Walk up to the front gate and examine the lock. Use your Axe or any other melee weapon to bust the lock on the gate. Once Harry gains entrance, direct him into the open sewer grate and down the ladder. |
| ^ |
18. SEWERS |
| |
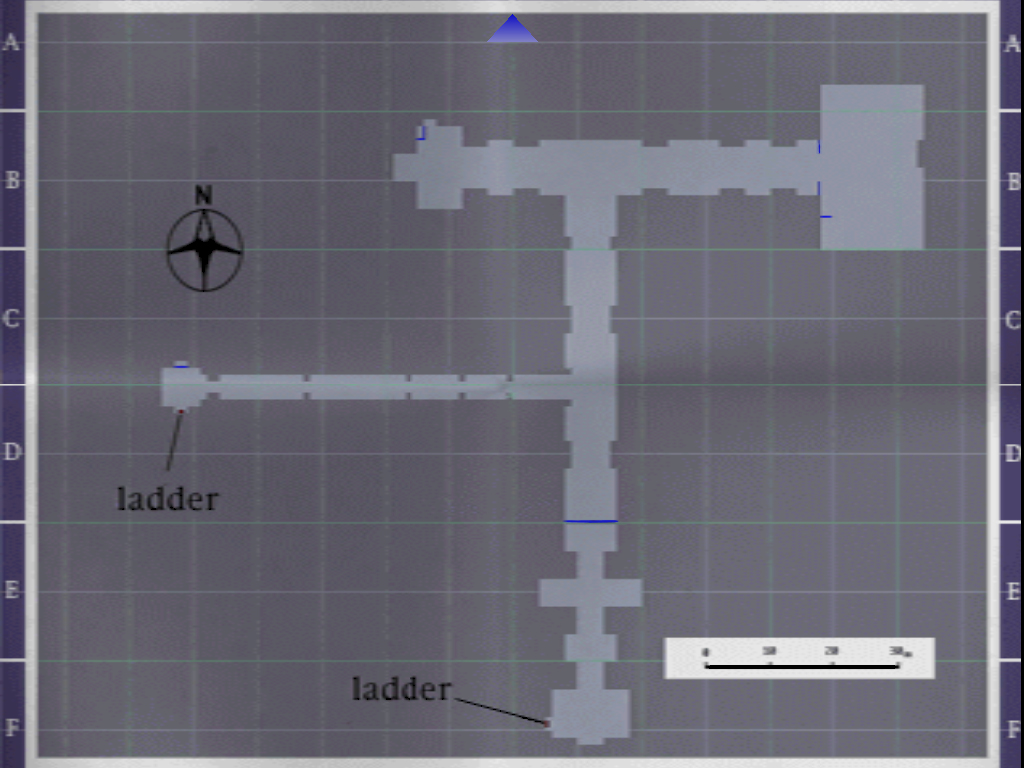
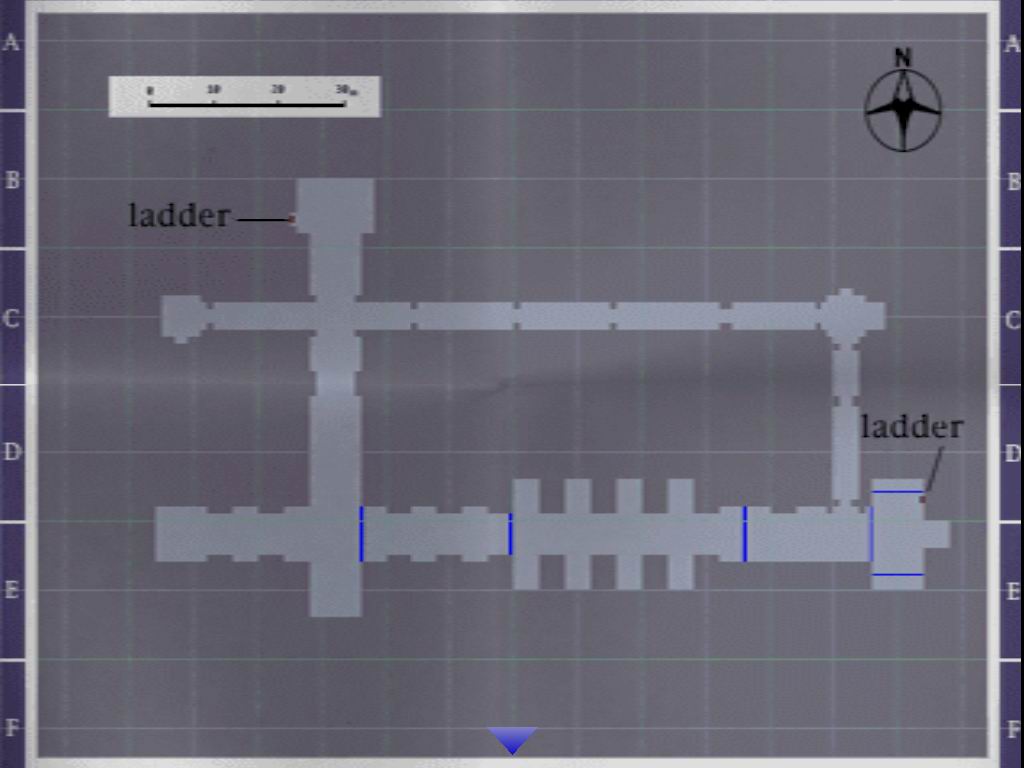
Turn right and go straight through the open arch. Avoid the Hanged Scratchers on the ceiling – they will make insect noises as you pass and somewhat resemble a praying mantis. Keep heading straight, and then take a left at the intersection where you first see water. Stay to the left, and follow the path all the way around. At the end there are some Rifle Shells. Head back and go left, then left again, down to the end to find some Shotgun Shells, Handgun Bullets and a Health Drink. Turn around and head back. Continue straight until your only option is to go to the right over a bridge. Take the next left and go straight until the next bridge – cross here and you will see that you are in sector C2. Go right from there and through the door that says “Keep Out”. Go left and around what seems like a water pump. Continue around another water pump and you will reach what looks like a makeshift office. Take the Sewer Key from the wall. Also, take the Sewer Map (connecting to resort area) from the desk. You may also want to use the Save Point on the desk.
Go through the door in this room that says “Keep Out”, then through the next door, which Harry will unlock from the other side. Go straight and avoid the Hanged Scratcher, past C2. Cross the bridge, continuing in the same direction. Then, cross the second bridge and continue in the opposite direction. Go around the corner and head straight, past sector C1. There is a solid floor here – continue until you see the locked gate that says “Keep Out”. Use the Sewer Key to enter.
Once here, cross the bright blue bridge and head straight. Cross the bridge at the end to the right and continue around to the ladder heading up.
There is a First Aid Kit to Harry's left. You will need to head South until the intersection, then take a left, heading East. Once near the end, several Creepers will come after you. Take the Health Drink and the Handgun Bullets. Keep going South.
When you reach the end, go right (West). Go through the door on the right. Cross the blue grating on the left side all the way to the end, and go through the door on the far right. Continue down through this area until you get to the door on the left, which you will need to go through. If you go straight, the camera angle will change, pointing out the significance of the blood pooling into the water. Examine this area and there will be a Sewer Exit Key in the water, which you will need to take.
A cutscene will occur in which several Hanged Scratchers surround you. Do not bother to fight as they will overtake you easily. Run past them and go through the door from which you came.
You will need to head all the way back to the East, to a locked door. You will need to use your map to direct yourself accurately. Use the Sewer Exit Key on the door surrounded by the Green Hanged Scratchers. Once through this door, you will find a Save Point. Make use of this, then climb the ladder up to the Resort Area of Silent Hill.
|
| ^ |
19. RESORT AREA
Part 1: Annie's Bar |
| |
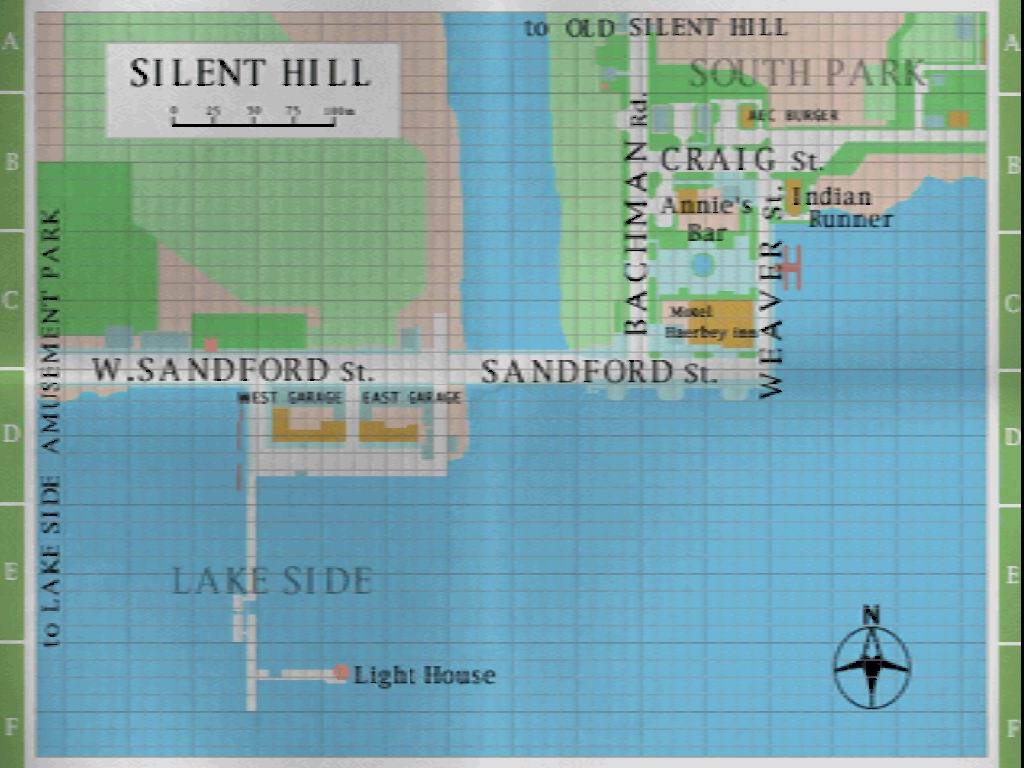
A DETAILED MAP OF SILENT HILL RESORT
Go straight ahead, and the camera angle will change. Go into the dilapidated building and you will find Handgun Bullets, Rifle Shells and a First Aid Kit. Go out to the street and you will see an information sign – pick up the Resort Area Map tacked to this sign. It is very important because the Resort Area of Silent Hill is extremely dark and it is easy to get lost.
Note: This next part determines which ending you will receive. There are two major flags that will determine whether you will get the bad+, bad-, good+, or good- endings. In all honesty, you can just head down Bachman Rd., then head West on Sandford St. to the lighthouse and skip a lot of story, but this will be detrimental to the quality of the ending you will receive. In this walkthrough, I will describe what you need to do to get the good+ ending.
Look for Annie's Bar on your map, and head there (South) down Bachman Rd. to get there. There will be some Rompers outside the entrance. Avoid them and go inside.
--->>>
You will see a cutscene of Kaufmann getting attacked by a Romper. Harry will shoot a bullet, and Kaufmann will cast the Romper aside, getting up to savagely kick it. Kaufmann thanks Harry for saving him, and asks if Harry has found a way out. Neither of them has, and they make some small talk. Kaufmann tries to hurry away when Harry asks him if he has heard of someone named Alessa. Kaufmann lies and says no, then leaves.
--->>>
Kaufmann dropped his wallet in between two pool tables, next to a bar stool with a blue covering. It is full of stuff. Pick up the Kaufmann Key, the Receipt, the two Health Drinks on the Bar, and use the Save Point.
|
| ^ |
20. RESORT AREA
Part 2: Indian Runner |
| |
A DETAILED MAP OF SILENT HILL RESORT
Leave Annie's Bar and head to the Indian Runner on your map. The fastest way to get there is by taking Craig St. East, then head into the front doors. Watch out for the variety of enemies awaiting you. If you examine the receipt dropped by Kaufmann, the combination “0473” is written on it. This will be used to open the lock on the door to Indian Runner.
Inside Indian Runner, you will find some Rifle Shells and a Health Drink on the other side of the counter. Examine the red book:
August 20
He came by. I handed over the package that the woman left here.
September 12
He showed up at Norman's, too. Don't want to be involved with the likes of them anymore, but... I'm getting creeped out even more than before. Thought of leaving town, but I'm afraid of what will happen if I do.
Examine the note pinned to the wall behind you:
3 loaves of bread.
3 cartons of milk.
2 dozen eggs.
Deliver to back door daily 8 a.m.
Rear entrance code 0886
Norman Young
Examine the picture next to the note. It shows Norman's Grand Opening at Norman's Hotel – a reference to the Bates Motel from Psycho.
Examine the drawer and open it. Inside, you will find a Safe Key. Use it to open the safe under the counter. Harry will find bags of drugs in the safe. Exit the Indian Runner and make your way to Norman's Motel. Head South down Weaver St. to get there.
|
| ^ |
21. RESORT AREA
Part 3: Norman's Motel |
| |
A DETAILED MAP OF SILENT HILL RESORT
After some running, you will find a door on the left that requires a combination code. Avoid the Air Screamer waiting for you. Enter the code that you found earlier in the Indian Runner – 0886. When you gain access to the building, go to the couch and grab the Magnet.
Also, the article that had been clipped out of the newspaper in Alchemilla Hospital is now readable:
Investigation stalled. “PTV” dealers still at large. Suspicious deaths continue. Like the anti-drug mayor, a narcotics officer dies of a sudden heart failure of unknown origin.
Go through the open doorway to the check-in counter. There is a Save Point. On the far desk in the lounge area there is another memo that reads:
September 10
Took package.
Told to sit on it awhile.
Don't want to get involved,
but can't disobey...
He's probably linked to the death
of the mayor and others.
Head around the desk and go through the door – you will unlock it from the inside. Go through the door. If you examine Kaufmann's Key, the tag on it reads the number “3”. Go to hotel room 3 and use the Kaufmann Key.
If you are on next fear mode, you can use the channelling stone here, outside Kaufmann's room, for the third out of five uses to get the UFO Ending.
Once inside, take the Health Drink from the bathroom, then push the shelf in the main room. There is a crack in the wooden floorboards and you can see the glinting of a key down there. Use your Magnet to retrieve the Motorcycle Key.
Exit room 3 and head back into the office which you unlocked. Go through the open door and take a right and go through the door leading to the garage. You will find Shotgun Shells and a Health Drink in addition to a motorcycle, which you need to examine. Harry sees that the dust has been wiped away around the gas tank cap. You will need to use the Motorcycle Key to open it.
Finding this vial in the motorbike is will help you get the GOOD+ or BAD+ Endings.
Not finding it will help you get the GOOD- or BAD- Endings.
--->>>
Harry finds a small glass vial, wrapped in a plastic bag. A cutscene will occur in which Kaufmann will come in, enraged at Harry. Kaufmann grabs the vial away from Harry, and tells him to mind his own business and find another way out of Silent Hill. Kaufmann threatens Harry's life if he continues to meddle in affairs that do not directly pertain to him. Harry tells himself he needs to move on and find Cheryl.
--->>>
Leave the motel through the back door. Go around the corner of Weaver St. and Sandford St. and head West. You will reach a cutscene. Silent Hill begins to become dark and alternate right in front of Harry, forcing him to realize that it's NOT a dream. Reality is becoming a nightmare.
|
| ^ |
22. ALTERNATE RESORT AREA |
| |
A DETAILED MAP OF SILENT HILL RESORT
Continue straight, following the West side of Sandford St. Pass two large garages, then take a left after the second one. Head South down towards the lighthouse. Watch out for enemies on your way there.
You will want to head down a set of stairs coming off of the left side of the pier. Cross the plank to the boat and enter the back doors. Pass the hanging corpse and enter the door at the end. There will be a cutscene.
--->>>
Harry once again meets Cybil. Harry admits to cutting the fence at the Waterworks. Cybil seems annoyed because she has no idea what's going on. Harry relays his side of the story to Cybil, and tells her not think he's crazy. He goes off of what Dahlia told him, and from his own experiences. Cybil tells him he needs to rest, when Dahlia suddenly bursts in with her crazy talk. She says that the “demon will swallow up the land”. Dahlia tells Harry that only two more marks of Samael need to be completed for the town to completely descend into darkness. Everyone will die. Dahlia tells him that in order to save Cheryl, he needs to stop the demon taking the form of Alessa. Dahlia instructs Harry to go to the lighthouse, then to the center of the Amusement Park. Cybil seems skeptical, but offers her help to Harry and goes to the Amusement Park. Dahlia tells Harry to use the Flauros and leaves.
--->>>
If you are on next fear mode, you can use the channelling stone here, in the boat, for the fourth out of five uses to get the UFO Ending.
Once you regain control of Harry, pick up the Handgun Bullets, the Rifle Shells, the Health Drink, and use the Save Point. Now it is time to head off to the lighthouse.
Exit the boat. Run across the plank to the left and back up the stairs and continue straight (South). Watch out for the Rompers and Night Flutters populating the area. Go down the next set of stairs you see on the right, then cross the plank onto a barge. Continue South down the barge, across another plank, then take a left off the barge using another plank. At the end of the plank, turn right and run straight. You will see a set of stairs going up on the left.
Go up the stairs and head to the right, and take your next left, then another right, going down another set of stairs. Head East from here, and then up the first set of stairs that you see. If you continue heading East, you will see the lighthouse. Simply go up the stairs and into the door on the front. There is a Save Point at the bottom of the spiral staircase inside. Head all the way up to the top of the lighthouse. A cutscene will show the “Mark of Samael” and Alessa will be there, soon to fade away into the night.
If you are on Next Fear Mode, you can use the Channeling Stone at the top of the lighthouse. This is the fifth time you use the Channeling Stone to achieve the UFO Ending. Sit back and enjoy.
Head back down to the bottom of the lighthouse, then exit. There will be a few Wormheads waiting for you down below. Run straight forward and you'll automatically be transported to the boat.
--->>>
There will be a cutscene. Harry mentions Cybil hasn't come back yet, and he is worried, so he decides to run to the Amusement Park.
--->>>
|
| ^ |
23. SEWERS TO LAKESIDE AMUSEMENT PARK |
| |
From here, exit the boat through the back. Cross the plank and go up the stairs. Head North, away from the lake. Once you reach W. Sandford St., cross the street and head to the left (West). You will find another Waterworks.
Enter the front gate and some Wormheads will be prowling about. Enter the sewers through the open cover and head down the ladder. A cutscene will occur. You see Cybil getting attacked by something unidentified.

Take the Sewer Map (connecting to amusement park) to the left. This part of the game is rather straightforward. The sewers are riddled with Hanged Scratchers, so beware. Head South until you reach an open area, then take a right. You will pass caged bodies on the right and then on the left. Head forward to a dead end and take the Health Drink on the ground. Head out into the open area and go North. Bear Claws will make their first appearance here, and there are more Hanged Scratchers awaiting you as well. Go left into the next opening you see. Head straight all the way through to the end, where you will find a ladder next to a discarded carousel horse. Ascend the ladder.
|
| ^ |
24. LAKESIDE AMUSEMENT PARK |
| |
You will hear static on your radio, but do not be alarmed. There are a few Stalkers about, and they are harmless. You will not have a map for this area. Simply go to the right and circle around the broken grating, then take another right, following more broken grating, to a fast spinning ride. From this ride, go left to find a yellow and teal concession stand. There will be an Apparition coming out by a Save Point on the other side. I recommend you save here.
To view a really interesting glitch, go up to the Apparition around the concession stand and use the Unknown Liquid on it. This will trigger an event, but to make a long story short (and not to spoil), it will teleport you straight to the next area and put you on your way to the good ending. This glitch is not recommended because you will skip the next boss fight entirely -- what fun is that?
From the Save Point, head straight while going to the right, going around some broken floor grating. If you keep going in that general direction, you will find a carousel and the camera angle will change as you approach the stairs. Go up these stairs and through the gate. A cutscene will occur. Cybil is passed out in a wheelchair. As Harry comes in, she arises from it, her eyes glowing red. She is slowly stalking towards Harry with a blank stare, and raises her gun to him, firing it.
|
| |
>>MONSTER (POSSESSED) CYBIL<< |
| |
In order to successfully defeat Cybil, you must understand she has been possessed by a strange creature in her back – the same creatures on the Possessed Doctors and Nurses from the Alchemilla Hospital. This boss fight is a major flag to which ending you will receive, and depending on what you do here, you will either receive a good+/bad+ ending, or a good-/bad- ending.
SAVE CYBIL (+):
You need to just get close enough to her and use the Unknown Liquid. You cannot use this item if she is an animation to hit you or raising her gun at you. you must use it only as she is walking towards you or from behind. The Unknown Liquid exorcises the creature possessing her.
KILL CYBIL(-):
Simply shoot her from afar, while dodging her bullets by strafing left and right. It only takes one to two shots from Cybil to kill Harry, so watch out. You may need to use an Ampoule, if you still have one. Make sure you heal after every bullet that Harry takes. If Cybil shoots Harry, and he falls to the ground, make sure you heal immediately on the ground. Cybil can and will come up to Harry with a finishing shot. If you run too far away from her, the carousel will begin. Run around and you will usually find her sitting on a horse. She will get off to shoot you.
When you've pumped enough lead into Cybil, a short cutscene will begin, showing that she has run out of bullets. At this point, the carousel will begin to spin around, and you will have to find her. When you find her, she will mercilessly chase you, then eventually grab your throat to strangle you. Keep shooting her until she dies.
--->>>
A cutscene will occur if you manage to use the Unknown Liquid. Harry will stomp on the creature that was possessing Cybil and they will have a discussion. Harry will admit that he adopted Cheryl on the side of the highway in Silent Hill while his wife was sick. Harry comes to the conclusion that Cheryl might have some kind of connection to the town and what is happening in it, but he still loves her and is adamant about saving her. Harry will walk away from the ride and find Alessa.
Harry asks Alessa to let Cheryl go. Alessa responds by flinging Harry onto his back with a kinetic power. Alessa created a force field in which Harry cannot pass. The Flauros in Harry's pocket rises up into the night sky and beings spinning, creating a specular event. A laser shoots out at Alessa, bringing her down to the ground. Harry persists about Cheryl, even after Dahlia comes out. It is obvious something fishy is going on to Harry by the way Dahlia is speaking to Alessa – you find out that she is Dahlia's daughter. Harry realizes they've been using him, in order to capture Alessa.
--->>>
|
| ^ |
25. NOWHERE PART 1 |
| |
There is a Save Point in this room, use it. All doors are jammed except for one – go through it and cross the metal grating to enter the double doors. Another cutscene will show the elevator doors open as if Harry were being summoned. Harry will exit the elevator.
From here, go straight and you will notice a ghostly apparition of Alessa as a child, running into the room reading “Phaleg”. You do not have a map for this area. Go to the end of the hall, then go through the door on the right, next to the door “Hagith”. Go down the stairs and into the door at the bottom. You will wind up in a classroom with one solitary desk in the center of the room. Examine the desk and you will find the phrases “Go Home”, “Thief”, “Drop Dead” have been scratched into the wooden surface of the desk. Go through the door at the end.
You will be back into a room from the hospital. On the gurney in the back, you will find a Screwdriver and a pair of Pliers. Leave this room and exit the classroom through the other door. Head up the stairs and through the door at the top. Watch out for the Possessed Nurses cluttering the hallways. Go all the way down the hall and enter the room on the right, next to the elevator. If you go to the back of the room, you will find that there is a key stuck in a faucet. Use your Pliers to get the Key of "Ophiel". Exit the room.
Find the door down the hall that reads “Ophiel”. Use the corresponding key and go through the door. This will take you into another hallway, straight out of the hospital. If you go straight to the end of the hallway, you can find a plate on the wall which reads:
Names engraved
On a lithograph.
The Grim Reaper's list.
Yes, the headcount is set
Young and old lined up
In order of age.
Then, the pathway opens
Awaiting them, the frenzied
Uproar, the feast of death!
This puzzle tells you how to enter the room on the other side of the hallway. Go to this door and examine the plate on the left. It reads:
The Grim Reaper's list:
35 Lydia Findly
60 Trevor F White
18 Albert Lords
45 Roberta T Morgan
38 Edward C Briggs
As the first plate reads, you need to put the young and old lined up in order of age. 18; 35; 38; 45; 60. If you take the first letter from each name, it will spell out “ALERT”. Enter ALERT into the panel on the right of the door and the door will unlock. Go through it and into the double doors at the other end. Go straight ahead to take the Amulet of Solomon off of the wall. Turn around and exit this room. A cutscene will occur.
--->>>
Lisa will be in the room waiting for Harry. Lisa says that she understands now why she is still alive when everyone else is dead – she is the same as them, except she hadn't noticed it before. She asks Harry to save her. Harry pushes Lisa away, as he feels she is deeply disturbed. A short scene will occur in which Lisa bleeds from every pore of her body. Harry notices this, exits the room, and closes the door behind her.
--->>>
Go back into the room after the cutscene. You will find Lisa's diary on the ground. It reads:
Ask doctor to let me quit being in charge of that patient.
It's too weird.
Still alive, but with wounds that won't heal.
Told the doctor I quit, won't work at that hospital anymore.
The room is filled with insects.
Even with doors and windows shut they get in to spite me.
To the hospital...
Feeling bad.
Need to throw up.
But nothing comes out.
Vomiting only bile.
Blood and pus flow from the bathroom faucet.
I try to stop it, but it won't turn off.
Need drug.
Help me...
Leave this room.
Go right into the hallway. Go straight, and go into the door on the right, next to the double doors. You should wind up in a room that looks like some sort of puzzle. If you examine the walls, you will four astrological signs – the scales, the symbol for Libra, with the number 2 underneath it; a crab, the symbol for Cancer, with the number 10 underneath it; a ram, the symbol for Aries, with the number 4 underneath it; and two fish, the symbol for Pices, with number 0 beneath it. The significance of the numbers to the pictures is how many appendages each symbol has. Examine the structure in the back of the room. On the far left, you will see the archer / centaur, the symbol for Sagittarius. Count the appendages – 6. Enter the number into the panel. In the center panel, there is a bull, the symbol for Taurus, with four appendages. Enter 4 in the panel. On the far right panel, there are twins, the symbol for Gemini, with eight appendages. Enter 8 into that panel, and a cutscene will show a Stone of Time falling from the center of the structure. Pick it up.
From left to right enter 6, 4, and 8 to release the Stone of Time.
Exit this room. Beware the Possessed Nurses in the hallway. Turn right and go through the first door, back into the main hallway. Watch out for more Possessed Nurses. Go left and go through the door next to the Phaleg room on the left. You will see what appears to be the Green Lion Antique Shop. Pick up the First Aid Kit and the Shotgun Shells. Use the Save Point. Use the Stone of Time on the clock. It will ding five times, and the glass will shatter. Pick up the Key of "Hagith", which was acting as one of the hands of the clock. Exit this room and go right, to the end of the hall, through the Hagith door. Use the corresponding key to open it.
Go into the elevator and take it to the second floor. Watch out for the Possessed Nurses in this hallway. Run straight ahead on the left side and through the third door on the left. This appears to be the jewelry shop from the Silent Hill Town Center. There will be Shotgun Shells, the Crest of Mercury, and the Ring of Contract. Leave the room.
Go straight into the double doors at the end of the hallway. Beware the Possessed Nurse. Go right and into the first door on the right. You will find some Handgun Bullets and a Camera on the desk in the back. Exit the room. Unlock the double doors from the other side but do not go through them. Instead, go back to the elevator. Take it to the third floor where you will see a brief glimpse of Alessa's ghost kneeling before an altar.
Examine the painting to the left and it will say “The light to the future”. Use your camera on this to reveal a specific pattern. Make note of it and go to the painting on the right -- “The light illuminating the darkness”. Use the camera on this painting to reveal another pattern you need to take note of. On each side of the room, there is a door with a panel with buttons that can be pressed in. The pictures correspond to the doors as to what side of the room they are on.
This is the puzzle solution:
Input the correct pattern and go through the first door on the left. In this room, you will find a Bird Cage Key on the chair to the right. Leave this room and input the correct pattern in the door on the other side and enter the room.
There is a Botanical Reference Book, but Harry mentions that he doesn't need to read it now. On Next Fear Mode, you may be able to read this book after reading the notes in the Police Station and the article clipped out of the newspaper. It reads:
WHITE CLAUDIA.
Perennial herb found near water. Reaches height of 10 to 15 in. Oblong leaves, white blossoms.
Seeds contain hallucinogen. Ancient records show it was used for religious ceremonies. The hallucinogenic effect was key.
In the European version the article from the Newspaper is in a book on the desk, but it has a little bit more information. It reads:
Investigation stalled.
"PTV" dealers still at large.
Suspicious deaths continue. First the anti-drug Mayor, now a narcotics officer dies of a sudden heart failure of unknown cause.
Fire broken out in town.
6 homes destroyed.
Charred body of Alessa Gillespie (7) found in aftermath.
Cause of fire currently under investigation.
Investigations show source as basement of Gillespie home. Blaze now believed caused by malfunction of antiqued boiler.
After reading this article Harry will note that the date of the blaze is the same day he found Cheryl.
--- Listen to the audio clip. Why this part was removed from the US release, we will never know.
Take the Health Drink. Exit the room.
Take the elevator back down to the first floor. Enter the double doors on the left. Go down the hallway, take a right, and go through the door to the left of the elevator.
You will hear the sound of a bird fluttering its wings, but with no bird to be found. Simply examine the birdcage and Harry will use the Birdcage Key. Take the Key of "Phaleg". Exit the room. Go right into the next room over and use the Key of Phaleg.
|
| ^ |
26. NOWHERE PART 2 |
| |
In this room, you will encounter some new enemies. They seem to be like the Stalkers – a harmless creature, but they sound, move, and attack more like the Mumbler. They are nearly invisible and difficult to avoid. You are better off shooting them.
Go into the door on the right, which appears to be the hospital kitchen, but with a very large refrigerator in the center of the room. When you examine the door, you will notice that the chain is missing a link. Pick up the Dagger of Melchior. Immediately use the Ring of Contract to secure the refrigerator doors. If you do not do this, Harry will meet a horrible fate as he attempts to leave the room. Some rather haunting music is playing, signifying something bad may be about to happen. As you try to leave this room, a cutscene will occur. Loud banging will be coming from the refrigerator – good thing you used the Ring of Contract.
Leave the room and turn right. Go into the next door on the right. This seems to be another room from the hospital. There will be Handgun Bullets, a Health Drink, and a bag of Jelly Beans. 39 Flavors! Open the bag and you will find the Key of “Bethor”.
Go through the double doors in this room and you will wind up in the video tape room from the hospital. Go to the television in the back and use your video tape. This time, you will be able to view your video tape without interruption. Listen to the videotape audio.
Leave the room through the double doors and exit through the other set of double doors in the next room. You will be back in the Phaleg hallway. Head across the hall into the next door. There will be a short cutscene depicting Alessa crying underneath a table – she will vanish. There are eyes scribbled all over the walls and floor. Take the Ankh from the wall.
Exit the room and head right. Enter the Bethor door with the corresponding key. You will end up in the generator room from the hospital basement. Press the switch to turn off the generator and leave the room. Leave the Phaleg hallway – you are now in the main hallway.
Go through the second door on the right – hopefully you unlocked it earlier as stated. This will take you to the second floor. There will be several apparition-like Mumblers. You need to enter the last door on the left.
Go to the back center of the room and use the screwdriver to take off the metal plate. Underneath, there will be the Key of “Aratron”. Turning off the generator eliminated an electrical current disallowing Harry access to the key. Exit the room and go right and down to the end of the hallway, back through the double doors leading you to the main hallway on the first floor.
Now, there will be some apparition-like Mumblers. Just avoid them and go back into the Phaleg hallway. Go to the last door on the right and use the key of Aratron. There will be a cutscene.
--->>>
Kaufmann, Dahlia and two doctors all standing around Alessa's bed – all of them ghostly. They are discussing their devious plans of using Alessa. They talk about needing the other half of her soul – Cheryl – in order to continue with the ceremony. They vanish.
--->>>
Once the cutscene is over, go to the machine next to the bed and pick up the Disk of Ouroboros, then exit the room. Go through the door across the hallway. This is Alessa's childhood bedroom. If you examine it, you will find butterflies in casings on the walls, along with sketchbook pictures on the ground. One of the drawings looks like a demon.
If you examine the door in the back of the room, you get this message:
thou possess them
to guard they spirit
evoke five rites
unveil thy fate
Place the following five items in the door:
Amulet of Solomon
Crest of Mercury
Ankh
Dagger of Melchior
Disk of Ouroboros
The background music will grow more and more intense as you add these items one by one. The door will unlock when you have used all five items. Use the Save Point on the desk and go through the door. There will be a cutscene.
--->>>
Dahlia is attempting to manipulate Alessa into using her power to help her. Alessa does not want to, and Dahlia tells Alessa it is for her own good. Alessa says she just wants to be with her mother. Dahlia has a revelation. “Herein lies the mother's womb, containing the power to create life.” She realizes she could have done it all herself. They both vanish.
--->>>
Descend the stairs and a cutscene will begin. It will be different depending on which ending you will receive. I will not reveal anything about the ending cutscenes. The ending boss will be different depending on whether you get the good or bad ending. The strategy remains the same. |
| |
>>>FINAL BOSS<<< |
| |
Note: if you encounter the boss fight with no bullets in your inventory it will automatically die after a timed period. 1 minute on Easy, 2 minutes on Normal, and 5 Minutes on Hard. Unfortunately, if on hard, you will not survive long enough if you're on your way to the BAD ending (trust me -- I will explain).
INCUBUS (GOOD ENDING):
Equip either the rifle or shotgun and get as close as possible. You have time to fire a good 5 or 6 shots into it before it strikes with lightning. QUICKLY start running around in circles. DO NOT STRAFE. If you run around the boss in circles, you will be able to avoid the attacks ENTIRELY. After it attacks, stop, get close, and unload another 5 or 6 shots, then repeat the process until it is dead. You should have no problem getting through this fight with no damage taken.
ALESSA (BAD ENDING):
Equip either the rifle or shotgun and get as close as possible, but CAUTION as there is a force field around her! Start blasting away at her and don't let go of the trigger. Eventually she will attack you. LET HER ATTACK YOU. You cannot avoid her attacks at all no matter how hard you try. You need to make sure you keep your health in "green". I recommend healing in the middle of your electrocution to prevent a one-hit-death. DON'T BOTHER MOVING. Just hold your ground. Fire as much ammo you can into her and get electrocuted, then heal. Repeat the process until she is dead. |
| |
>>>THE END<<< |
| |
Congratulations, you just beat Silent Hill.
Sit back and enjoy the ending. Stay tuned after the credits and you will be treated with a Blooper Reel and a Rank Screen telling you how well you did, as well as showing you what you unlocked for Next Fear Mode. The GAME RESULT screen uses a series of Big and Small stars to tell you how you did.
Save your game. Ready for another go in NEXT FEAR? Visit the SECRETS section before you do so you know what can be accomplished next. Read below for a brief overview of the endings and how to get them, as well as how to read the GAME RESULT screen. |
| ^ |
THE ENDINGS, GAME RESULT, NEXT FEAR |
| |
>>GAME RESULT SCREEN<<
The GAME RESULT screen is a great break-down of your gameplay statistics and it even shows you items you unlocked in the background. You can see how far you've walked and ran, as well as your weapon accuracy. But what is most important is getting the best ending, hardest difficulty, fastest time, and more.
Under "Your rank," every BIG star counts as 10 points and every SMALL star counts as 1 point. So, for example, if you have 4 BIG stars and 6 SMALL stars, that means your score was 46 points out of 100 -- the goal is to get 10 BIG stars -- and this is a challenge.
To get a good score, close to 100 points, you need to do the following:
Beat the game on NORMAL or HARD difficulty.
Beat the game 5+ times and get the GOOD+ Ending.
Use up to two saves and no more than one continue. (0~2 Saves; 0~1 Continue)
Beat the game in under two hours. (0~120 minutes)
Pick up 150+ items plus all the secret items. (5~6 Secret items)
Kill a large number of enemies by Fighting and Shooting.
Limit your "No aiming shots" to a minimum. You get more points based on the longest range shots ratio, so the more kills via long range or middle range, the better. This is not absolutely necessary, though. Just try not to miss any shots.
These steps should help you get the best rank.
>>ENDINGS<<
- GOOD+ ENDING
Find the vial in the motorcycle at Norman's Motel and SAVE Cybil by using the Unknown Liquid on her.
- GOOD- ENDING
Find the vial in the motorcycle at Norman's Motel and KILL Cybil.
- BAD+ ENDING
DO NOT find the vial in the motorcycle at Norman's Motel and SAVE Cybil by using the Unknown Liquid on her.
- BAD- ENDING
DO NOT find the vial in the motorcycle at Norman's Motel and KILL Cybil.
- UFO ENDING
Pick up the Channelling Stone in the convenience store on the Northeast corner of Bachman and Finney. You will need to use the Channelling Stone in the following 5 places:
- Rooftop of Alternate Midwich Elementary.
- In the courtyard, outside the front entrance of Alchemilla Hospital, before the Moth Boss.
- In the parking lot of Norman's Motel (Resort Area of Silent Hill).
- In the boat, before visiting the lighthouse.
- On the roof of the lighthouse.
After using the Channelling Stone on the lighthouse, the ending will occu
>>NEXT FEAR MODE<<
You must beat the game once to unlock this. Load the save titled "Next Fear" to play.
Every time you play a new game on Next Fear Mode it will automatically be a harder difficulty. If you started on EASY, the Next Fear will be on NORMAL, and if you started on NORMAL, the Next Fear will be on HARD. You will need to continue from Next Fear in order to obtain all of the endings and have them on record. Also, everything you unlock will show up in the background of your Game Result screen.
I will talk more about NEXT FEAR MODE and the items you can unlock in the SECRETS section.
|
| > |
SECRETS AND ENDINGS |