| ^ |
01. BATHROOM
|
| |
--->
The game opens with the main protagonist, James, looking into a mirror. He studies his complexion for a moment, and then rises to take a deep breath. He asks himself if “Mary” could really be in this town.
--->
WATCH THE VIDEO STRATEGY
If you have beaten the game in both "Born From A Wish" and "Letters From Silent Heaven" a Blue Gem will be available to pick up by the toilet stall, this will help you get the UFO Ending in the same way as the Channelling Stone in SH1
Once you gain control of James, turn around and walk out of the bathroom.
--->
James studies his surroundings, then slowly paces towards the stone wall. In the background, you hear Mary narrating a letter she wrote to James. He said he got a letter from her, even though it couldn't be possible – she died three years ago of a disease. Mary mentions in her letter that she is waiting in their “special place”. James ponders which special place it could be and decides to check out Silent Hill.
---> |
| ^ |
02. HEADING TO SILENT HILL |
| |
WATCH THE VIDEO STRATEGY
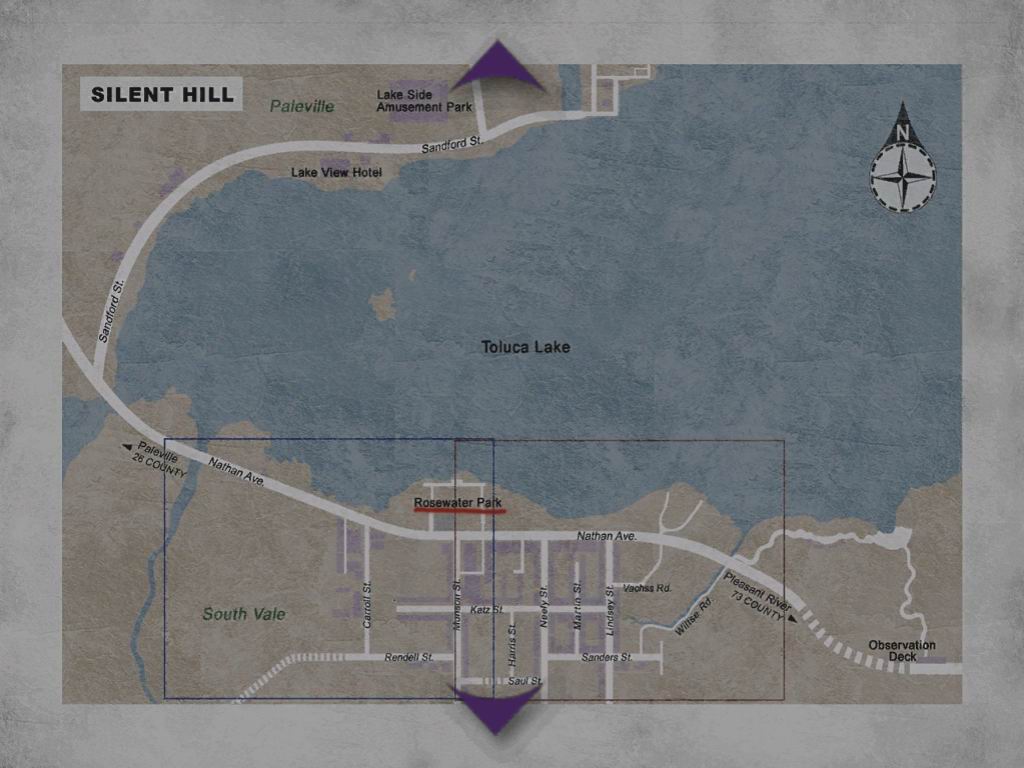
Go towards the open door of James' aqua-colored car. Grab the map of Silent Hill off of the seat. Turn around and run towards the left side of the screen until the camera angle cuts to a white van. Follow the sign that says Toluca Lake and go down the stairs.
Notice your main inventory. You start out with only a Photo of Mary and a Letter from Mary. Be careful of how often you examine these items, as it will contribute to the ending you receive, which will be explained more later.
The letter in your inventory reads:
In my restless dreams,
I see that town.
Silent Hill.
You promised you'd take me
there again someday.
But you never did.
Well I'm alone there now...
In our “special place”...
Waiting for you...
Run along the dirt path into the fog. You will be traveling for a while before you reach the next area – the developers of Silent Hill 2 commented that this long journey into Silent Hill was entirely intentional, for symbolic reasons.
You will come to a well on the right. Peer inside and you will find a red save square - a Save Point. James comments that it gives him a weird feeling, like someone's groping around inside his head. Save here if you wish.
Keep heading down the path until you reach a pair of giant iron gates leading into a cemetery. Run straight ahead until you encounter a cutscene.
--->
You will see Angela sitting in front of a grave stone. James interrupts Angela, admitting he is lost. He asks for directions, but Angela tells him to stay away – there's something wrong with the town, but it's hard to explain, possibly dangerous. James admits he doesn't care whether it's dangerous or not. Angela goes on to say that she is in Silent Hill looking for her father and brother (but in a cemetery?). They say their good-byes. You can also check back with Angela for two different cutscenes – one of them being quite humorous.
--->
Run through the cemetery, following the gravestones around to the right. The exit to this cemetery is to the right of the small building on premises, to the left of a pond and a tree. Go through the next big iron gates, back onto a dirt path.
Follow this path for a great while (if playing through for the second time, you will find a Chainsaw embedded into a stack of wood, alerted by the noise it is making. In the PC version, it's just given to you the first playthough.). You will reach an open section on the left and eventually walk up to a gate that says, “Danger! Keep out!” Go through this gate onto Wiltse Road – take this road all the way up to Sanders Street. Take a left, then cross the road to find a First-Aid Kit on a bench next to a flower shop. From the flower shop, head West on Sanders Street. You will hit a cutscene where James finds bloody smears on the road and witnesses a creature moving through the fog. Follow the creature, specifically the blood smears, heading North on Lindsey Street.
|
| ^ |
03. AROUND TOWN |
| |
WATCH THE VIDEO STRATEGY
Grab the Health Drink on your right by the shutters of a garage and eventually turn right onto Vachss Road. Go in through the gate on the right. You will find two Health Drinks and a Save Point. Leave this area and continue heading up Vachss Road. It eventually turns into dirt and you will go through a large gate. Once you reach the end, you will find some construction going on in a tunnel. A nearby radio will begin to emit static from inside the tunnel. Attempt to go through and a cutscene will occur.
--->
James will find the radio emitting all the noise – and an unpleasant visitor. Seems as though it was feasting on a nearby corpse. James will pick up the wooden plank. Hit the creature three to four times and it will fall onto the ground. James inspects it and decides it's definitely not human.
--->
Upon leaving the tunnel, another cutscene will occur. James remembers he picked up a radio as it begins to emit static again, as well as jumbled speech. It seems to be a message to James, but is indecipherable. Run back to Lindsey Street and take a right. There will be a cave-in, in the road, so James will need to find an alternate route to Rosewater Park. Turn around and grab the Health Drink on the East side of the street – it will be against steel shutters. Continue down and there will be Patient Demons, like the one you encountered in the tunnel. Cross the road to momentarily read a small stone monument. James can't read it because the surface has been rubbed away.
Remains of _____ Swamp
The __ers of land surroun__
_is monument was originally
swamp, but was later fil___
Fr__ng ago, t_______s
nicknamed Blood Swamp becausE
the _____ers poured the wat_
_sed to wash the ex_____ols
in here.
Perhaps it's fol______hat
many pe_____m to have s__
____n the area.
I suggest that your first stop be the Motor Home on Saul Street, it's difficult to miss. Inside you will find a note -- I'll wait at “BAR Neely's”. There will be a Save Point. If you beat the game once, there will be a Hyper Spray waiting for you on a table.
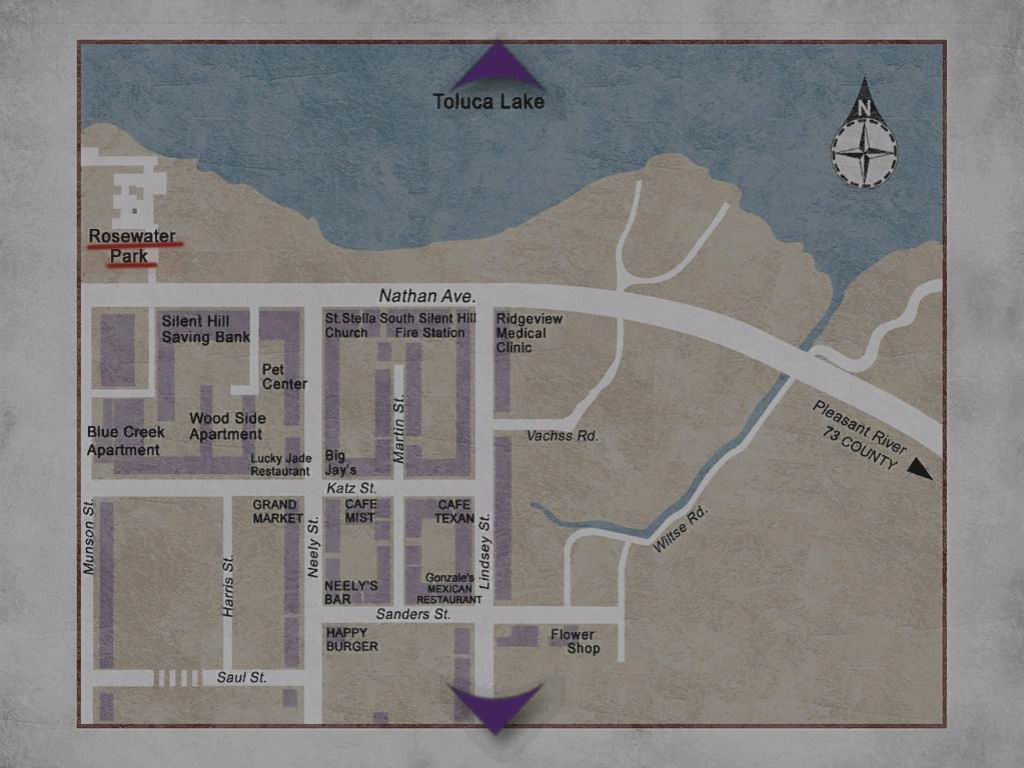
Exit the Motor Home (door at the West end of Saul Street is locked and will not be accessible until later) and make your way to Neely's Bar on the East side of Neely Street. Inside, you will find a map which cannot be picked up, showing accessible and other areas of interest. You'll mark a few spots onto your own map. “There was a HOLE here. It's gone now” will be written on a window plastered with old newspaper. Wonder what that means.
Exit Neely's Bar and there will be a First-Aid Kit across from Neely's Bar further South, past a corpse. Follow the question mark on the map found inside Neely's Bar. Head to the North end of Martin Street. To the left is a Health Drink. If you get too close to a white van ahead, a Patient Demon will come out from underneath. Be wary of this as you examine the corpse at the end of the alley. Take the Apartment Gate Key off said corpse and head back, taking a right onto Katz Street. On the Northwest corner of Katz Street and Neely Street, you will find a First Aid Kit and Handgun Bullets. Be careful of a Creeper on the ground.
At the far North end of Neely Street, you will find a corpse and many memos left behind. These are aimed at helping you through your quest in Silent Hill:
I'm going to write everything that
I've learned so far. Maybe that will
help you out somehow.
If you're reading this,
it probably means I'm
already dead.
I saw those demons. They were
there, I'm certain. But my friend
says he didn't see anything.
If that's true, does that mean
that what I saw was an illusion?
But whether that demon that
ate human beings was real, or
whether it was just some kind
of hallucination that my mind
dreamed up... one thing I know
for sure is that I'm beyond all
hope.
It seems that they're attracted
to light. That's why people who
need light to see are their natural
prey.
They also react strongly to sound.
If you want to go on living,
you'd be better of just sitting
in the dark and staying quiet.
But even that probably won't
save you.
If you're going to try to fight them,
the most important thing is to relax.
It's dangerous to fire a gun while
you're all crazy with fear.
Take good aim, and then squeeze
the trigger. And don't forget to
finish them off. I think most of
those creatures can be killed,
even if they are tougher than
people.
Run away.
Run away! Run away! Run away!
Run away! Run away! Run away!
Run away! Run away! Run away!
You can explore the town at this point for health items and ammo. There is a First-Aid Kit around the back side of Happy Burger, a Health Drink across from Happy Burger on a porch on the other side of Sanders Street, and there is a Health Drink down the South end of Martin Street (an alley intersecting Katz Street and Sanders Street). There is a door at the West end of Katz Street, but next to it there is a message scribbled in blood. It reads, “The door that wakes in darkness, opening into nightmares.” Head to the Wood Side Apartments, circled on your map in red. Outside the apartments you will find some scratches on the ground and a large gate which you will use your Wood Side Apartment Key on.
|
| ^ |
04. WOODSIDE APARTMENTS |
| |
WATCH THE VIDEO STRATEGY
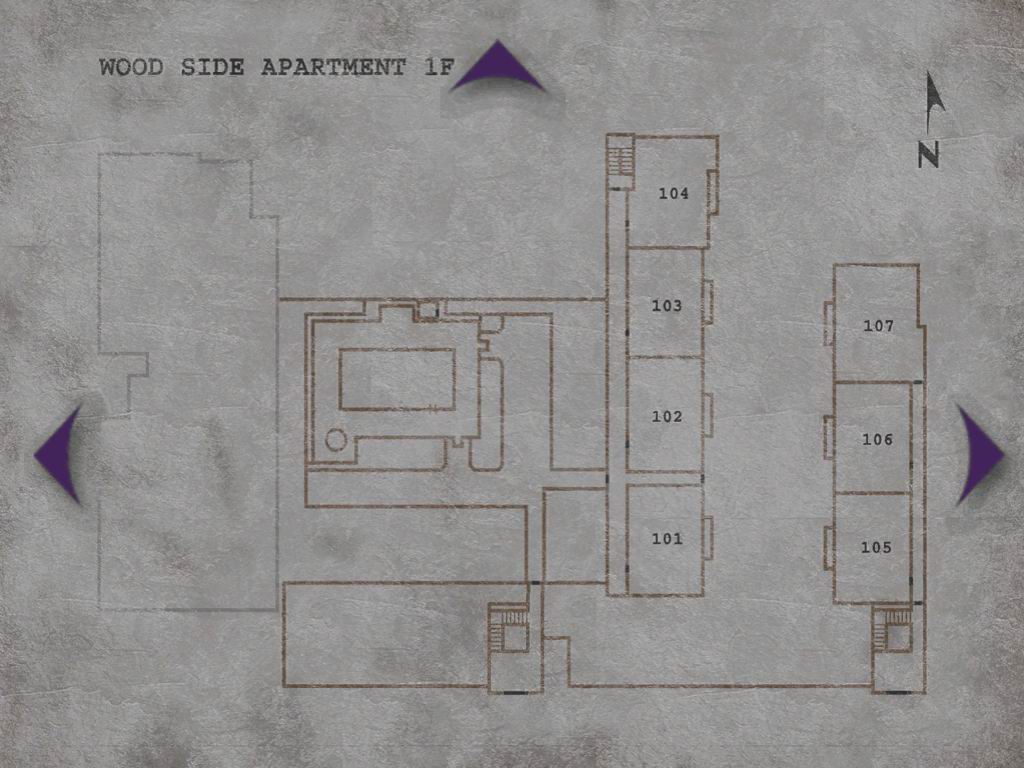
Go through the large doors, entering the apartment complex. Grab the map on the left – “map of the apt bldg”. Grab the Health Drink and use the Save Point if you wish.
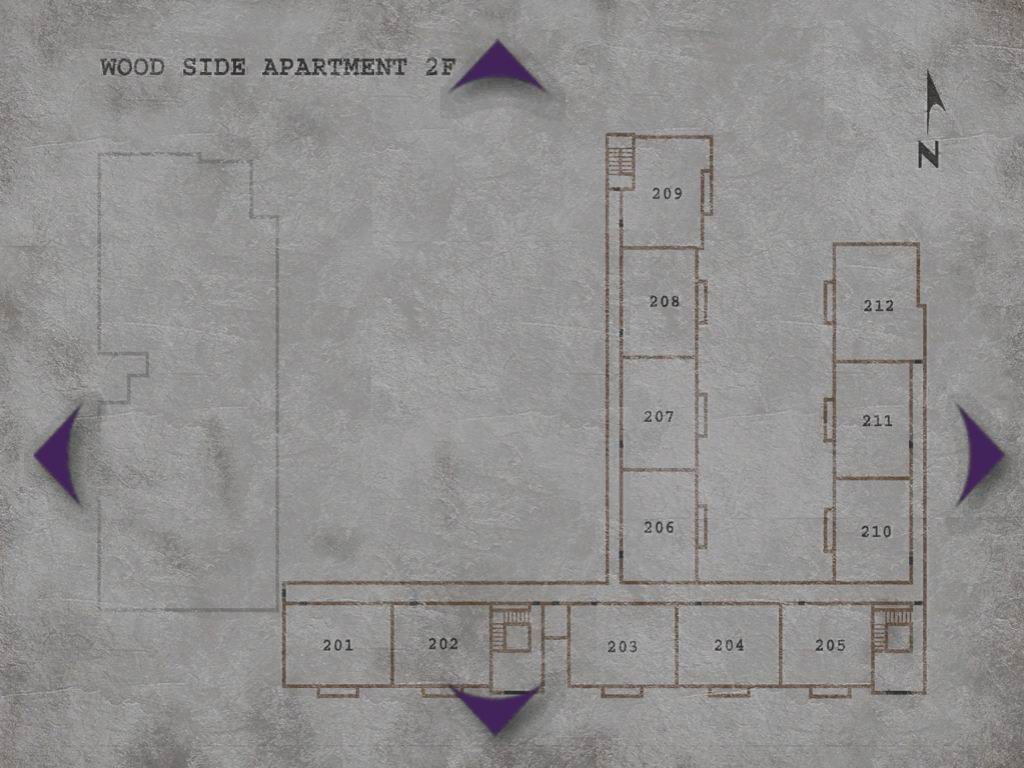
Head up the stairs to the second floor and go through the door. Turn right and head down the hallway, passing a Patient Demon, and go through a door on the right – Room 205. Inside is a Flashlight on a mannequin with clothing remarkably similar to Mary's. Once you grab the Flashlight, a Mannequin monster will arise. Either fight it or leave the room.
On the second play through, there is a notepad on the vanity that will subliminally help you achieve the different endings you have not received yet. It is titled, “Search for Another Conclusion”.
For more information on this article visit the endings / secrets section.
You can go inside Room 210 for Handgun Bullets x2, but both a Patient Demon and Mannequin await you.
Head left from Room 205, then go back into the stairwell past the laundry room on the left. Ascend the stairs to the third floor and enter the door. To the right, you will see some bars blocking the way to a key. Try to pick up the key and a cutscene will occur.
--->
James reaches beyond the bars for the key, using his hand. A young girl comes out of the laundry room, stomps on James' hand and kicks the key out of his reach, only to laugh and run away.
--->
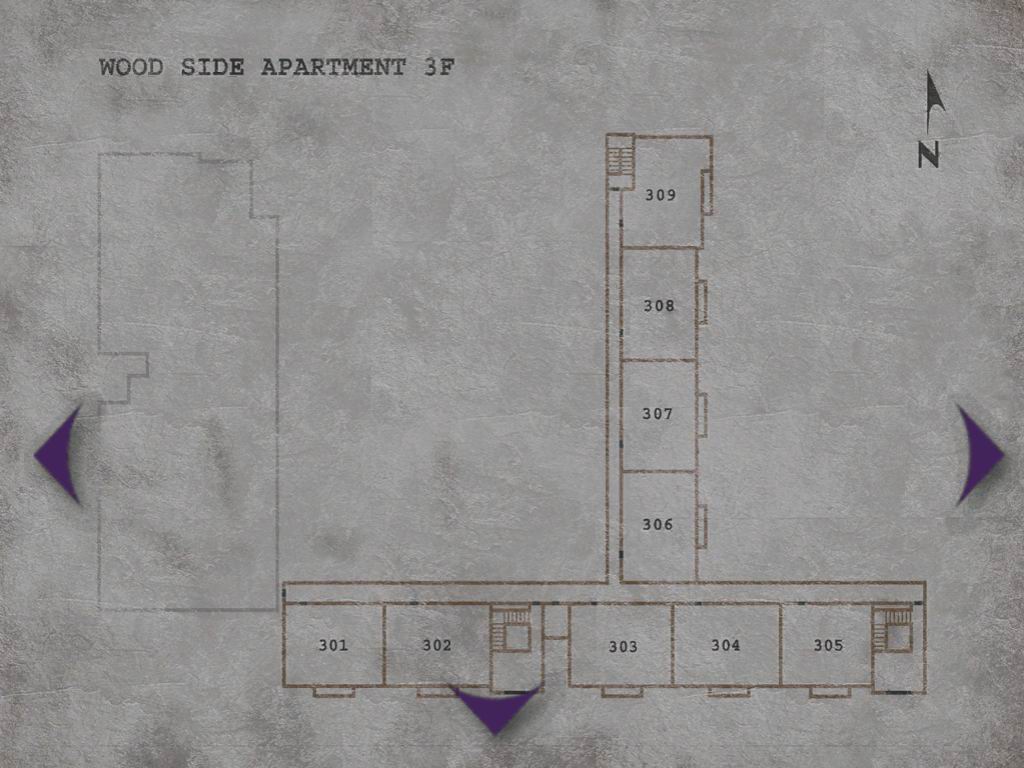
Turn around and head down the hallway, into the last door on the left – Room 301. Inside, you will find quite a scene, with handgun bullets plastered all over the walls and shattered furniture littering the room. Examine the red shopping cart in the center of the room and James will find a Handgun. If you do not have the flashlight by the time you come to this room, James will not see the handgun or be able to pick it up. Exit the room and head back down the staircase to the second floor.
Take a right, then take a left at the intersection of the hallway. In doing this, you will hear a strange noise North of here... Follow the noise. What's that strange red, glowing figure beyond the bars? Enter Room 208 on the right.
Inside this room, you will hear TV static. Approach the corpse in front of the television set and inspect it. After the cutscene, examine the bookshelf for the Key to Room 202. Leave this room and head down the hallway to Room 202. Use the key to enter.
Once you are inside, go into the bedroom and inspect the glowing green hole in the wall. Make James stick his hand in there, and he'll find a Clock Key, after a scare. This is the key to the clock in the bedroom of Room 208. Grab the Health Drink in the kitchen on your way out.
Go to Room 208.
--- Clock Puzzle --->
There's a book on the side-table and it will help you with the following puzzle.
On Easy Riddle Difficulty the memo reads:
Three different sizes,
time on the run.
Three young men circlin'
round the sun.
Henry is short and
very, very slow,
Scott can't stop,
he's always on the go.
On Normal/Hard/Extra Riddle Difficulty the memo reads:
Three needles stand of
three different heights.
The fat, the tall and the thin.
From slow to fast they
move to the right.
Scott rests not on three,
but fifteen.
In the bedroom You will find some names, along with cuts made into the bedroom wall, opposite the clock. If you examine it, you will see the names “Henry,” “Mildred,” and “Scott”.
For this puzzle, they use the “H” in “Henry” to represent hours, the “M” in “Mildred” to represent minutes, and the “S” in “Scott” to represent seconds. Simply take this information and use it for the following puzzle.
Read the side of the clock, “the scars from the past shall remove the nail that stops Time.” This clearly represents the cuts into the wall representing the time that you needed to turn the clock to.
Use the Clock Key on the clock, and James will open the door to reveal the face of the clock – turn the arms until it reads “9:10”, the solution to the puzzle. Push the clock to reveal a hole, leading to the next apartment over.
------>
Go over into Room 209. Inside, you will find a Health Drink in the kitchen, and a Save Point.
Exit the room and head right into the stairwell. Climb the stairs to the third floor and take the Handgun Bullets. Go into room 309 for a cutscene.
--->
James will spy a large red pyramid thing pinning down two mannequins in a position that appears to be sexual in nature. James immediately goes into the closet quietly, as not to be seen or heard. The large creature drags a mannequin out of the kitchen and comes towards James, hiding. Terrified, James unloads a whole clip of handgun bullets into it, and the creature runs away. Checking to see if the coast is clear, James exits the closet.
--->
Go back inside the closet and grab the Courtyard Key.
Leave room 309 and head left down the hall. Go right at the intersection and pick up the Fire Escape Key, that was kicked away from you earlier. Inside the laundry room you will find some Handgun Bullets. Head east down the hallway into the door leading to a stairwell at the end. Go down to the first floor and turn left into the hallway. At the end you sill find some Canned Juice. Turn around and exit the apartment through the front door. Go West and into the other entrance to the apartment, then head back up into the second floor hallway. You will need to go into the laundry room to your immediate right. Examine the trash chute and you will see a bunch of garbage blocking it up, so use the Canned Juice to push it through.
Go back downstairs and out the front door, leading outside. Go left, around the building to the trash area. You'll get the Coin [Old Man] – the first out of three coins you need to collect.
You will also find a passage out of a gossip magazine.
The police announced today that
Walter Sullivan, who was arrested
on the 18th of this month for the
brutal murder of Billy Locane and
his sister Miriam, committed
suicide in his jail cell early on the
morning of the 22nd.
According to the police
statement, Sullivan used a soup
spoon to stab himself in the neck,
severing his carotid artery.
By the time the guard discovered
him, Sullivan was dead from blood
loss, the spoon buried two inches
in his neck.
An old schoolmate of Walter
Sullivan's from his hometown of
Pleasant River said “He didn't
look like the type of guy who
would kill kids.
But I do remember that just
before they arrested him he
was blurting out all sorts of
strange stuff like 'He's trying
to kill me. He's trying to
punish me. The monster... the
red devil. Forgive me. I did it,
but it wasn't me!'.”
The schoolmate then added
“I guess now that I think of it,
he was kinda crazy.”
Go back inside the West wing entrance to the apartments and go straight ahead to use the courtyard key on the door. Head to the waterless pool in the center of the courtyard to find three Lying Figures and a red stroller. Go to the stroller, simply by running around the monsters, and pick up the Coin [Snake].
Exit the pool and head to the Eastern door. It is recommended you go right, and into room 101, but you can also explore room 103 to read a sight-seeing brochure.
Welcome to Silent Hill!
Silent Hill, a quiet little lakeside
resort town. We're happy to have
you. Take some time out of your
busy schedules and enjoy a nice
restful vacation here.
Row after row of quaint old houses,
a gorgeous mountain landscape,
and a lake which shows different
sides of its beauty with the
passing of the day, from sunrise
to late afternoons to sunset.
Silent Hill will move you and fill
you with a feeling of deep peace.
I hope your time here will be
pleasant and your memories will
last forever.
Editor: Roger Widmark
Once inside room 101, you'll hear someone hurling in the bathroom. Stop by the kitchen to see a gruesome aftermath of a murder. A corpse's legs hang out of the refrigerator. Grab the Handgun Bullets in the corner of the room, then go into the bathroom for a cutscene.
--->
You will meet Eddie, in one of the most awkward ways. Eddie will be puking his guts out and claiming “he didn't do it” and that he had nothing to do with the dead guy in the kitchen (yeah right). James will introduce himself and ask Eddie if he is friends with the red pyramid thing. Eddie says he doesn't know what James is talking about, but claims that he does see some weird monsters through town. James came to this town just as Eddie did, something just called out to them.
--->
You can go back into the door to check on Eddie again and explore his room. Seems Eddie had an infatuation with football, but due to the negative messages implied in the scribbles and drawings, he didn't have a good experience. Leave Room 101 and head back to the West wing of the apartments. Go up the stairs to the second floor and go left, down to the West end of the complex. Use the Fire Escape Key on the blue door at the end of the hallway and a cutscene will occur as you try to go through it. Seems they knocked down the fire escape when the building was built next door. Go across to the next building.
Now, you are inside the Blue Creek Apartment building.
|
| ^ |
05. BLUE CREEK APARTMENTS |
| |
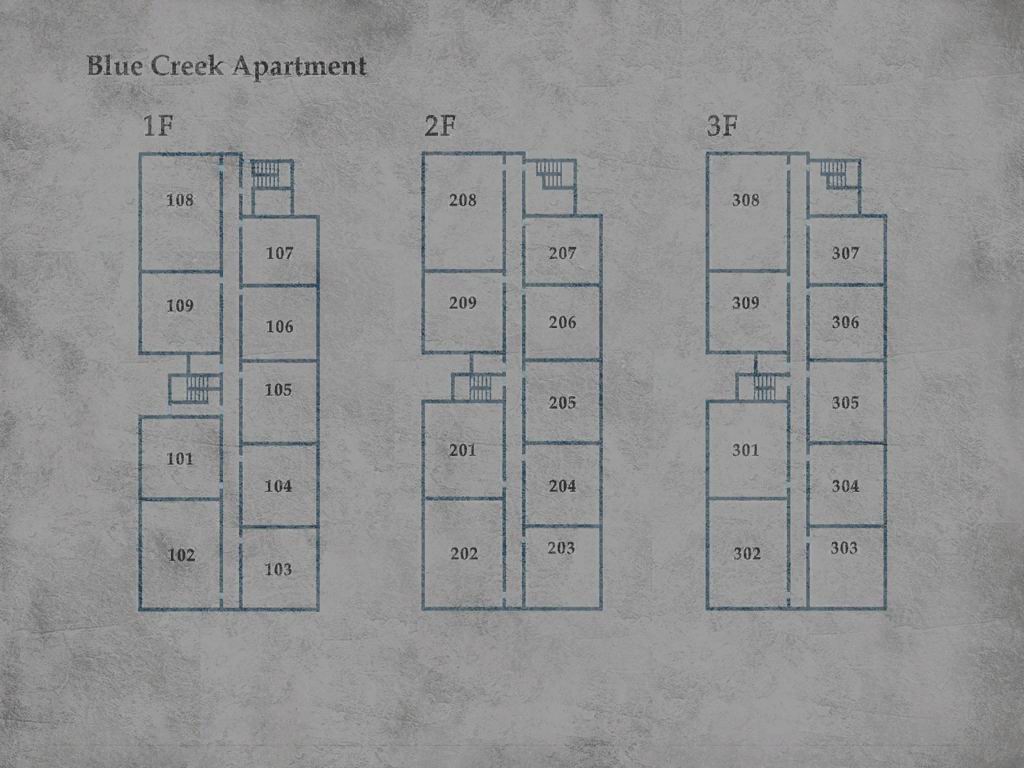
WATCH THE VIDEO STRATEGY
--- Safe Puzzle --->
Head into the bathroom and examine the toilet. Inside the toilet, you will find a wallet with a random set of numbers. Depending on the riddle difficulty you are playing on, the complexity of the puzzle will change. The combination you will find is for the safe in the living room of the same apartment.
On easy or normal difficulty, the numbers tend to look like this: 19 >> 20 << 13 >> 10. Simply turn the dial on the safe to the correct set of numbers (in the correct direction, according to the arrows).
On hard difficulty, roman numerals are used in conjunction with numbers so that the combination would look more like this: VV9 >> X2 << 1 >> X0. That would translate as (5+5)+9 >> (10)+2 << 1 >> (10)+0, then 19 >> 12 << 1 >> 10. If you have trouble understanding roman numerals, here is a quick overview:
I – 1
II – 2
III – 3
IV – 4
V – 5
VI – 6
VII – 7
VIII – 8
IX – 9
X – 10
On extra hard difficulty, 1-9 are written as numbers, while 10-20 are written as letters of the alphabet. An example would look like this: h >> 2 << 7 >> 8. A quick chart for what the letters represent is this:
a – 10
b – 11
c – 12
d – 13
e – 14
f – 15
g – 16
h – 17
i – 18
j – 19
k – 20
In the safe you will find four sets of Handgun Bullets.
------>
Take the Health Drink in the kitchen and exit this room. Go right in the hallway and go past the laundry room, examine the note on the door of Room 209.
Dear Tim,
I have to run an errand so
I'm going out.
I left the house key with Uncle
David (You know where he lives,
don't you? The key is in the room
near the first floor staircase.).
I'll be back as soon as I can, so
please watch the place while I'm
gone.
You need to get the key for this door, but in order for you to do that, you need to go downstairs via the staircase next to the laundry room. Do not miss the map of the west apt bldg. on the ground, inside the staircase. Once in the first floor hall, turn left and go into Room 109. Take the Handgun Bullets on the couch and go through the bedroom door for a cutscene with Angela.
--->
James stumbles across Angela in the apartment room and they finally trade names. Angela is on the ground in front of a mirror with a knife and possibly suicidal thoughts. James tells her to stop what she is planning, but she admits they are the same, “it's easier just to run.” He asks if she found her mother, but she says that she is nowhere to be found. He says something about Angela's mom being in the town, but she gets edgy and asks James how he knew – although he just assumed. James admits that he cannot find his wife; probably because she is dead. James doesn't think he's crazy, despite believing a dead person wrote him a letter. Angela asks James to hold her knife, as she “doesn't know what [she] might do.” As James reaches for the knife, Angela shrieks with the knife held out at James; she thought he was going to hurt her. She apologizes, sets the knife on the end table, and leaves.
--->
Angela's knife will now be in your inventory. You can examine this knife to help receive the “In Water” ending. Pick up the Coin [Prisoner] from the end table – this is the last of three coins that you need. While in Angela's bedroom you can examine a torn photograph, most likely of Angela's family. Her father and brother are completely ripped away from Angela and her mother. Leave room 109.
Go right and head to the door across from the laundry room – 105.
--- Coin Chest Puzzle --->
Once inside, you will find a Save Point and a small chest with five circular indentations laid in metal. Here, you will need to use your three coins that you have gathered in a specific pattern in order to open the wooden chest. There is a metal plate on the chest with a poem, hinting at how to open the chest. For each riddle difficulty level, the poem is different.
Easy Riddle Difficulty
To the right is the lady.
To the left is the old one.
In the center dwells the other.
Now just two spaces remain,
But fear not for now,
The puzzle is done.
The puzzle is done.
Solution: Old Man, blank, Snake, blank, Prisoner.
Normal Riddle Difficulty
Three bright coins in five holes be
At one end sits
the Seducer of she
The wind from behind
the woman doth play
The Formless One,
Null, lies furthest from they
The Old One beside
the Serpent sits not.
Tis to the Prisoner's left
that he doth rot
Solution: blank, Old Man, Prisoner, blank, Snake
Hard Riddle Difficulty
First lies the seat of
He who is Peerless
Silent and empty,
heartless and fearless
Beside him sits the one who knows
The place of the servant is
next to the throne
Dozens of feet,
yet not a single toe
The One that is Hidden
beside him doth go
Seducer of dreams,
creature of Hades
Lying further from
Man and closer to Lady
Man and Woman seeing all
Heedless to the Raven's call
Silent and Hidden the two may be
They be not there for you to see
Return them to whence
they would be
And blessing shall
descend on thee
I speak thus with
the North Star behind me
The birth of the sun is
the start of the story
Solution: blank, Old Man, blank, Snake, Prisoner.
Extra Riddle Difficulty
Like coins in the hazy
aether tossed
Our Souls must by
their sinful weight
Descend to earth
with lightness lost
To "right" the sins
that they hath laid
When thrice in falling they intone
Then Happiness shall be thy own
The first note be not by
the Horned One rung
Though it be there that
all sins be sprung
the Bringer of Life and
the Bringer of Shame
The sins of the latter be
even more tame
Though coming
in the Aged One's wake
The Formless One's soul
in fear doth quake
The Needless One, silent
with hungers all sated
Is least then in sin
with his lusts all abated
For the gravest of sinners
His place be appointed
And if he be lucky
may his soul be anointed
You will also notice that after examining the coins on Extra riddle difficulty, there will be more hints.
The back of the Old Man coin has an engraving of a Gravestone.
The back of the Prisoner coin has an engraving of an Egg.
The back of the Snake coin has an engraving of a Crecent Moon.
Solution: Old Man, blank, Snake, Prisoner, blank.
Place the coins into the correct pattern and the chest will unlock and open, revealing a Lyne House Key – the key to room 209.
------>
If you have completed the game once, you will find White Chrism on the kitchen counter. This will help you achieve the “Rebirth” ending.
Exit room 105. Head across the hallway and into the laundry room for a First-Aid Kit, on top of the washing machine. Then, follow the exit sign into the staircase. Go upstairs to the second floor and enter the door to the hallway. Go left and use the Lyne house key on room 209.
Once in room 209, head out onto the balcony and go into the adjacent room – 208. There is a Save Point, some Handgun Bullets on the chair, and the Apartment Stairway Key is on the bed.
Exit this room, and out of room 209. Make your way left, where a mannequin blocks the way to the locked blue door on the right. Go through this door, using the apartment stairway key, and a cutscene will occur.
|
| |
>>APARTMENT RED PYRAMID THING<< |
| |
WATCH THE VIDEO STRATEGY
The red pyramid thing seen earlier will be doing some interesting things with a Lying Figure as James enters, but as if it lost interest in the monster, he drops the demon and starts heading for James.
This boss fight is very easy and you only need to fire a single bullet. Simply evade all attacks that r.p.t. makes, and stay out of his way. In time (2-3 minutes), a siren will ring out and make r.p.t. turn around to descend the stairs, into water. If you stay where you are from the very beginning, r.p.t. will come for you... if you shoot him with your handgun, it will slow down and take longer to reach you. It will attempt to swing its knife at you, but it will not hit you. Right as r.p.t. gets nearer to you, and attempts to attack you for a second time, strafe or run by it to the opposite corner of the room. Fire two or three good clips at it (if you please) to slow it down and the battle will soon be over.
Red pyramid thing has three main attacks. 1. It will attack you with a one-hit-kill overhead swing of its knife (that takes a long time), which is easily avoidable if you get enough distance. 2. It will swing its knife sideways, which varies in speed. If you're careful, you can avoid this attack. It will usually try to attack you with this strategy when it isn't even close enough to hit you – that gives you more time to either evade or fire more shots into it. 3. If you get too close to it, it will grab you by the neck and strangle you. A weird tongue protrudes from its helmet and attempts to lick James. Try not to get close enough to it to let this happen.
You'll know the fight is done when the siren rings out and calls red pyramid thing away from you, down a flight of stairs descending into water. When r.p.t. reaches the door, the water will drain out, allowing you access. Go down the stairs and out through the door on the right. This will take you outside. |
| ^ |
06. ROSEWATER PARK |
| |
WATCH THE VIDEO STRATEGY
Once outside, head down the stairs and go straight. Pick up the First-Aid Kit, then go the only way possible, through an alley. You will reach a cutscene.
--->
Laura will be amusing herself and James comes along accusing her of stepping on his hand earlier. She says, “maybe I did”. James asks what she is doing in Silent Hill anyway, with which she responds, “are you blind or something?” James asks her what that letter is, but she says that it is none of his business because he didn't love Mary anyway. Laura runs away, leaving James in a state of confusion.
--->
Continue through the alley and head left into the first available stairway to receive the Handgun Bullets x2. Continue north into Rosewater Park. You'll know you are there when a cutscene indicates it. Run past the sign. Go to the left, up some stairs, then right, down more stairs. On a bench you will find a Health Drink. Continue down more stairs and go right. Continue forward through the opening and you will find Handgun Bullets on another bench, near a gazebo. Go north, towards the lake, then go right for another Health Drink. Go West and you'll soon encounter a cutscene with a strange woman overlooking the lake.
--->
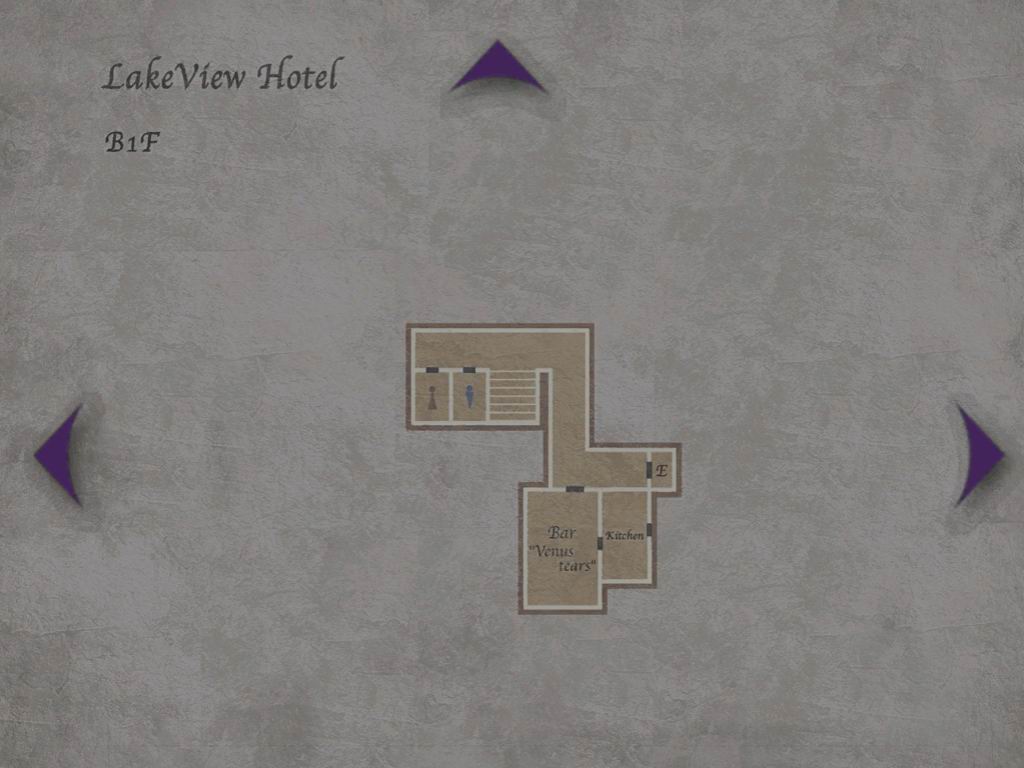
James will call out, “Mary”, but will then realize the woman is not her. He admits that she looks just like Mary and could be her twin. Maria introduces herself, then he asks her if she has seen Mary. James tells Maria that he got a letter from Mary, telling him that she is waiting in their “special place.” Maria says that she hasn't seen Mary, and asks James if this was their only special place. James thinks about it and a reverie depicts the Lakeview Hotel. James mentions that the hotel may be their “special place” and Maria makes a sarcastic joke about it saying, “I'll bet it was”. She tells James how to get there, and Maria tries to follow. James will be confused as to why she wants to go with, but she'll tell him about how lonely she is, and will use her resemblance to Mary as a form of manipulation. James agrees and Maria follows him, James directing the way.
--->
There will be a monument that reads:
In memory of the sixty seven
who died of illness and now sleep
beneath the lake.
There are other monuments in the area of Rosewater Park, one being:
Victim of persecution
by t________ans.
Jenni___ Carroll lived
with pride and honor.
What happened here
shall never be forgotten.
The other being:
Patrick Chester, son of Edward.
He fought and died for the people,
for liberty and for all of our
tomorrows.
His memory lives on.
Run straight ahead from the end of the cutscene, then up the set of stairs on the right. Continue South, up the stairs. On the right, you will encounter a mannequin. Kill it and grab the Health Drink by it.
After beating the game with all three endings, or once with the REBIRTH ending, you can go straight from here, across Nathan Avenue into an empty dirt lot. You'll find a dog house with the Dog Key inside. This will help you get the DOG ending.
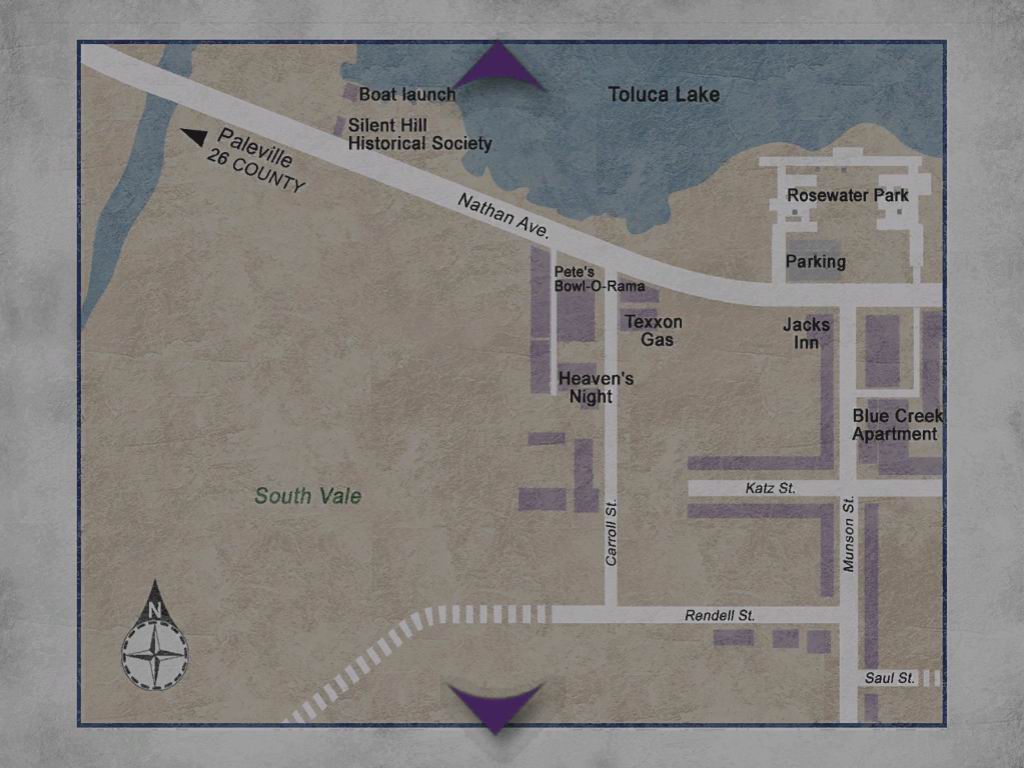
Go right onto Nathan Ave and continue West towards the Lakeview Hotel. There's a Jack's Inn with a Save Point on a car in the inside parking lot. Once you reach the Texxon Gas Station on the left, go towards the running car and take the Steel Pipe. This will stop the motor on the car.
If you have beaten the game once, the book of Lost Memories will be inside a news stand, near the building. Collecting this will help you get the REBIRTH ending.
Continue on Nathan ave. If you head on the right side, mannequins will fling over onto the street from the side of the road. Ignore them and continue up the road. Pass the Historical Society on the right and more mannequins will fly out from the bushes. Just keep heading up the road. Soon you will find some Handgun Bullets, and a corpse with a map on the ground. View it and James will circle Pete's Bowl-O-Rama on his map. As you can see, the road is decimated and you'll have to find another way to the hotel.
Head towards Pete's Bowl-O-Rama, careful of the mannequins already encountered. Once there, head into the front doors. A cutscene will occur and Maria will mention that she hates bowling, so she will wait outside.
|
| ^ |
07. BOWLING ALLEY |
| |
Go into the first door on the left and a cutscene will play.
--->
Eddie and Laura will be at a lane talking. Eddie is eating pizza when Laura asks what him what he did – robbery or murder. He says he did nothing of the sort and continues eating his pizza. Eddie did mention to Laura that the cops were after him, but Eddie just said he ran away because he was scared. Nobody will ever be able to forgive Eddie for what he has done.
--->
Eddie will ask Laura if she found Mary, as she seems to be looking for her. Once you gain control, of James, head around to the door on the other side. Another cutscene will play when you circle around the counter towards Eddie.
--->
James will ask if Eddie is alone and he will say no. Laura will say “bye-bye” and leave the bowling alley. James asks Eddie to go after her, but he refuses and James, frustrated, decides to go after her himself.
--->
There are some Handgun Bullets at the end of one bowling lane, hard to see, but there. Leave the bowling alley, and once you run away a cutscene will occur. Maria will be out of breath from trying to catch Laura, and she'll tell James where she went. Go around the backside of the bowling alley and into the large gate at the end. Run to the end of the alley and Maria will point out that Laura went through a crack between buildings. James asks if there is another way, and Maria points towards the back door of Heaven's Night. Try to go through the door and Maria will unlock it with three keys, all on different parts of her body. Go through the door.
Head up the stairs in Heaven's Night and go through the last door on the right. There is a First-Aid Kit on the chair in here. Leave the bar, through the other entrance. Head down the stairs, and go right on Carroll Street. You will run a long ways before a cutscene will occur with Laura running into the main entrance of Brookhaven Hospital. Go inside the hospital. |
| ^ |
08. BROOKHAVEN HOSPITAL |
| |
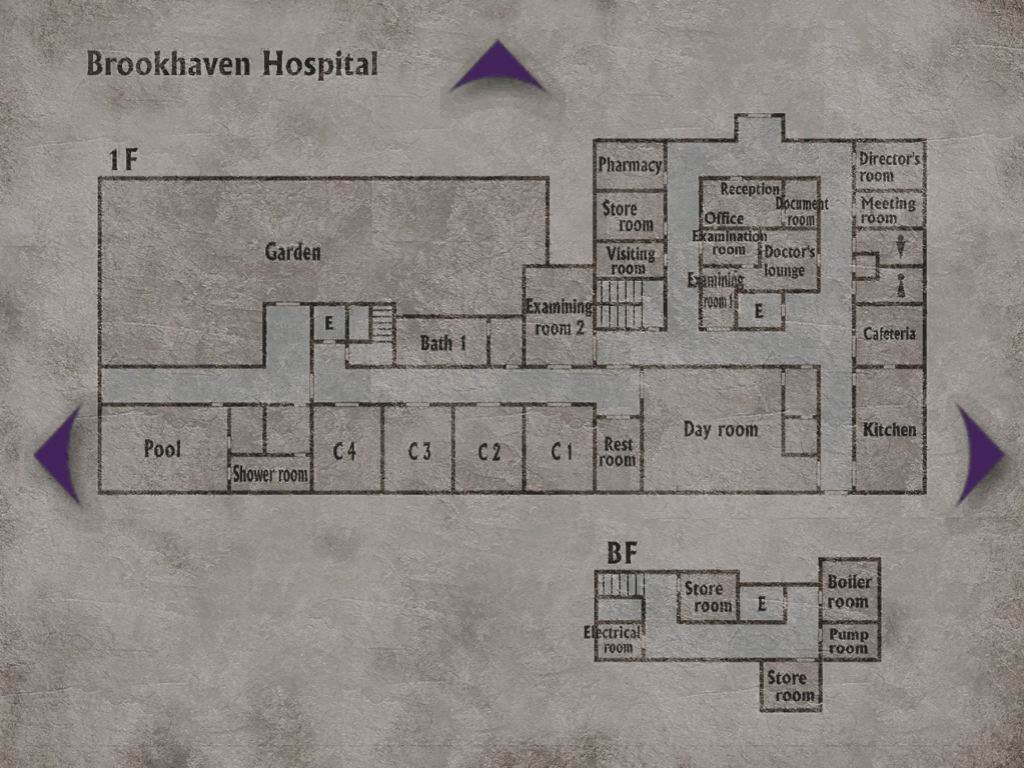
WATCH THE VIDEO STRATEGY
Immediately, on the left from the entrance, there will be a map of the hospital. Head into the reception, ahead on the right. Inside you will find a Save Point and a Health Drink on the desk. In here is also a memo that reads:
[Jack Davis]
He has attempted suicide three
times in the past for reasons
unknown. Although he is normally
a model patient who follows
doctor's and nurse's orders, he
must be watched closely due to
his past pattern of sudden and
violent suicide attempts.
[Joseph Barkin]
His illness seems to be rooted in
the fact that he believes he is
guilty of causing his daughter's
death. His symptoms suggest a
psychotic break and paranoid
delusions. Normally calm, but has
a tendency towards violence when
excited.
[Joshua Lewis]
History of hospitalization as well
as numerous assault, battery and
other violent offenses. He has a
strong persecution complex and
a tendency to solve things
through violence. Extreme caution
necessary.
Save if needed and go into the other door at the end – the “Document Room”. Check the area next to the typewriter for some documents describing a patient, Joseph, experiencing an “other side,” there will be a “Purple “Bull” Key there as well – “...a key to that box” as it is written at the bottom of the document. The memo reads:
The potential for this illness
exists in all people and, under
the right circumstances, any
man or woman would be driven,
like him, to "the other side."
The "other side" perhaps may
not be the best way to phrase it.
After all, there is no wall between
here and there. It lies on the
borders where reality and unreality
intersect. It is a place both close
and distant.
Some say it isn't even an illness.
I cannot agree with them. I'm a
doctor, not a philosopher or even
a psychiatrist.
But sometimes I have to ask
myself this question. It's true
that to us his imaginings are
nothing but the inventions of
a busy mind. But to him, there
simply is no other reality.
Furthermore he is happy there.
So why, I ask myself, why in the
name of healing him must we drag
him painfully into the world of our
own reality?
(Something else is written by hand.)
I got the key from Joseph.
It's probably the key to that box.
Leave the room, and leave the office.
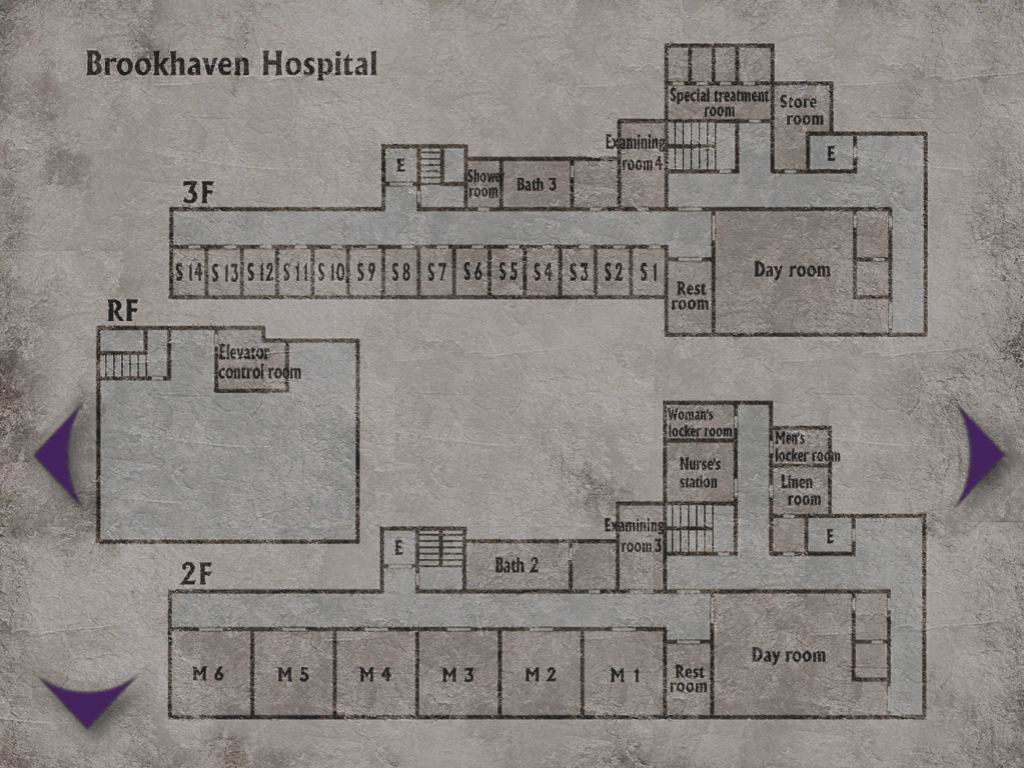
Once you've returned to the main hall, you'll notice just about every door is either locked or jammed except for one, this door is to the staircase near “Examining room 2”. Take the stairs up to the second floor, with Maria inevitably following you. There will be two nurses waiting for you here, take care of them, or run around them and go up the North corridor to the door on the left – the “Woman's locker room.” If you examine the teddy bear on the table you'll get a brief cutscene where James “pricks himself,” but finds a Bent Needle in the process. In the locker next to that you will find a Shotgun. Exit this room and head into the door on the other side of the hallway – the “Men's locker room.” In the bloody jacket hanging from the locker you will find the Examination Room Key, take it and leave the room. Go through the big double-doors across from the staircase.
Directly in front of you, you will find some Handgun Bullets. Next go into “Examining room 3,” which happens to be the first door on the right. You will find a First-Aid Kit on the bed and a typewriter at the end of this room with a four-digit number you will need to either write down or remember. This number is randomized and is never the same.
On Easy/Normal difficulty the carbon paper reads:
i know it i know the number of
the box #### it cant help
him anymore the button key
doesnt scare me so nobody
can stop who i am i don't know
who i am is who i am is who
i am is
On Hard/Extra difficulty the carbon paper reads:
i know it the secret i'll give them
something to deal with this demon
shelter is of no use any more he is
my instrument he must follow my
orders yes, the box will be useless
now i must not forget it ####
that's good he is the lowest now
i too will be free and he will serve
me i am a genius no one can stop
me one can stop me no one can
stop me can stop can stop no no
Exit back out into the hall and go into room M2. One one side of this room you will find a night-stand with an open drawer, inside is the “Lapis Eye” Key, and you will find some Shotgun Shells on top. Beside that, there is nothing else in this room, so leave. This is optional, but if you want to explore the other rooms for items, you can, just be careful as there are two nurses guarding the hallways. In Room M3 you will find Handgun Bullets and a Health Drink guarded by a lone nurse. Room M6 has Shotgun Shells and a Health Drink, also guarded by a lone nurse. Exit the hallway the way you came in and go back to the staircase, then take the stairs back down to the first floor as you are going to unlock and enter the Examination room using the key you got earlier.
Inside the Examination room, there's nothing, so cross over to the Doctor's lounge. Here you will find some Shotgun Shells in the sink, but you main focus is the white board on the wall next to an open filing cabinet.
On Easy/Normal difficulty it says, “3rd floor patient wing hall – 7335”.
On Hard/Extra difficulty it says,
The pin number this month is
"T". Last month it was "X"
and before that it was "Z."
But what are they going to
do next month? That's all they
can express with 4 numbers.
Anyway does the door to the
Patient Wing really need to have
its combination changed this
often?
Head out through the door right next to you, on your right. Head back to the staircase and go up to the third floor.
In this room you will find two stray nurses and a First-Aid Kit at the far Northeast corner of the hall. Go to the double-doors across from the stairs and enter the combination you found from the Doctor's lounge.
Here are the combinations to the 3rd floor patient wing hall for all difficulties:
Easy & Normal – 7335
Hard & Extra – 1328 (Like the letter "T")
Once through the door, turn right and head down the hall to Room S3, which is the third door to the left. Maria will sit down on the bed and tell him she is quite tired form a hangover. He convinces her to lay down and stay here while he goes to look for Laura. Unless you want to try for the Maria ending, you shouldn't check back on her, but you can view two different short cutscenes if you do. Next to Maria, on the nightstand, you can pick up the bloody Roof Key. Exit S3 and head back to the staircase. Ascend to the roof and use the key you acquired in S3 on the door here. On the rooftop, you can cut across to the far corner to read a diary strewn over the ground. I do not recommend you read this unless you are trying to obtain the In Water ending. This is what it says:
May 9
Rain.
Stared out the window all day.
Peaceful here - nothing to do.
Still not allowed to go outside.
May 10
Still raining.
Talked with the doctor a little.
Would they have saved me if
I didn't have a family to feed?
I know I'm pathetic, weak.
Not everyone can be strong.
May 11
Rain again.
The meds made me feel sick
today.
If I'm only better when I'm
drugged, then who am I anyway?
May 12
Rain as usual.
I don't want to cause any more
trouble for anyone, but I'm a
bother either way.
Can it really be a such a sin to
run instead of fight?
Some people may say so, but they
don't have to live in my shoes.
It may be selfish, but it's what
I want.
It's too hard like this.
It's just too hard....
May 13
It's clear outside.
The doctors told me I've been
released - that I've got to go
home.
I --------------
Run to the North, towards the Elevator control room for a shocking surprise.
The red pyramid thing seems to have followed you and silently gotten on the roof to appear right behind James! James turns around to catch a chestful of the blunt end of the aberration's great knife, knocking him through a fence and down through the ceiling of the locked Special treatment room. When James gets up, you will regain control only to realize that your health has hit rock bottom and you need to use a First-Aid Kit.
The third door from the right can be entered. On the wall next to that it says: "If Joseph looks calm, he can be taken out of his cell." Enter the small padded room and examine the wall on the left of James. There should be a four digit number written in blood, but sometimes very hard to make out. Use your best judgment here and write the numbers down, or memorize.
This is what it says:
####
Tern tern tern the numbers
better not forget them
So i'll right them down here
The other one, my secret name
Exit, and unlock the door to exit back into the hallway. Go into the second hallway through the double doors and go straight to the end of the hall to the door on the left, Room S14 (you will encounter a nurse and two mannequins along the way).
In Room S14 you will discover a message on the wall that reads: "Louise, I'll take care of you four ever. It's my destiny!" and a box with two four-digit combination locks, and two key locks. By now you should have the two keys needed, the “Lapis Eye” Key and the “Purple Bull” Key, so use them. You should have the combination to the two locks also. If you can't remember what they are, simply access the Memo section in the Inventory. The combination you found in blood in the padded cell (“Tern tern tern the numbers”) goes into the turn-style lock and the combination found on the carbon paper (Imprint on carbon paper) goes into the other. Once you unlock the box, you'll receive a Piece of Hair, turn around and exit the room.
Run down the hallway and enter the Shower room on the left. You'll notice a bunch of green dye on the ground surrounding a drain, inside you'll see something stuck inside. If you didn't already guess, you'll need to combine the Bent Needle you got off of the teddy bear with the Piece of Hair you just got to fish the Elevator Key out. From here, you can simply exit and make your way to the elevator to the right, or you can enter Room S11 for a Save Point and a Health Drink.
Once on the elevator, take it down to the first floor. If you want, go into room C3 for some Shotgun Shells and Handgun Bullets. Go into room C2 and run towards the end of the room to trigger a cutscene.
--->
Laura will be happily playing with her teddy bears, until James calls out her name. Laura, surprised that he knows her name, won't tell James how she knows about Mary at first, but then she discloses that she met her last year at the hospital. James calls her a liar as Mary was supposedly already dead then. Laura decides to go with James out into the hallway. Suddenly, she seems to remember there was something important she needed to get – a letter from Mary, which happens to be in a locked room. James heads inside as Laura stays behind just to slam the door shut behind him, revenge for calling her a liar earlier. James notices strange monsters coming down from the ceiling and starts to panic, banging on the door, and telling her to open up. Laura refuses after he calls her a “snotty little brat” and she leaves him in there to deal with the monstrosities on his own.
--->
|
| |
>>FLESH LIPS BOSS<< |
| |
WATCH THE VIDEO STRATEGY
There will be three of these enemies, but only two to begin with. They have two main attacks. If they get right on top of you, they'll grab you with their “feet” and start choking you – avoid this by not standing in one place for too long. If they are a slight distance away and facing you, sometimes they will do a lunge and attack you with their “feet” - this takes a large portion of health, so just keep moving. Equip the shotgun. Usually you can get one or two blasts off before you need to get as far as possible from them, then you can get another couple shots off. Make sure you wait until James is aiming the shotgun upwards to get a sure shot, otherwise you may miss. If you want, you can use the handgun because it has an advantage. The handgun can make them move towards you a lot slower – it will nearly immobilize them, but it is mostly recommended when there is one left, otherwise it'll make you vulnerable to attack. After you kill one, it will curl it's “legs” up and stop moving, so sometimes you can get the other monster to catch onto the dead one in order to get a bunch of cheap shots at it.
After you kill the first one with the shotgun, you can handle the second one in the same manner, or pull out your handgun to finish it off quickly. You'll notice, after the second monster dies, a third will descend from the ceiling. Continue using your handgun (or shotgun) to take care of this one. It'll take about 8 shots with the shotgun or 25 shots with the handgun to take one of these monsters out. You'll know the monster is dead when you hear sirens and the screen goes blurry.
You'll be treated to a cutscene after the fight of what sounds like Mary being carted on a gurney across a grated metal floor. Basically, you were being transported to the Alternate version of Brookhaven. |
| ^ |
09. ALTERNATE BROOKHAVEN HOSPITAL |
| |
WATCH THE VIDEO STRATEGY
If you have the Blue Gem, you can use it here, in the rainy garden, to help you get the UFO Ending. This is one out of three places in which you need to use the Blue Gem.
Exit the garden through the double doors. Straight ahead you'll find some Shotgun Shells and a Save Point to the right. Exit through the double-doors across from the save. In the next area, you can just turn left and go into the elevator right away, or explore this floor for items. Room C2 has a nurse in it, but kill it and grab a First-Aid Kit. Room C1 has a nurse as well, but kill it to grab some Handgun Bullets and a Health Drink. When you're done, head to the elevator.
Take the elevator up to the second floor. There should be three nurses here. Turn right from the elevator and go into the last door on the left – Room M6. There's Handgun Bullets, a First-Aid Kit, and in the wall, surrounded by a drawing of reaching hands, a Dry Cell Battery, and a Basement Storeroom Key. To the right of this, on a bed is a memo that reads:
I was locked up inside
the basement's basement.
It was so small and dark
and I was so afraid.
I dropped my precious ring.
But I will never,
ever go back there.
Head out of the room. You can either go back into the elevator, or explore this area for items. Room M4 has two nurses in it, along with a Health Drink and Shotgun Shells. The Day room has a fridge in it, but we'll get to that later as James cannot open it by himself. Once you're done head to the elevator.
Take the elevator to the third floor. Go left and head out of the double-doors at the end of the hall, otherwise you can search for items. Room S11 has Handgun Bullets and an Ampoule, there is a scrap of paper on the bed with a doodle that has something written on it.
She is an angel no one knows only
I can see the Lady of the Door
they cannot walk along her Bridge
of Thread they fall from the weight
of their crimes.
Like bloated and ugly corpses
their sins she devours them
sin and sinner alike she saves
me she is an angel.
When you're done exploring, go through the double-doors at the end into the next hall. There are two nurses in this area. Go into the door across from you, into the staircase. A Save Point is on the wall. Take the stairs down and down as far as you can go. You will hear a loud squeaking. You'll use the key you got on the door at the end. Pick up the Shotgun Shells and push the shelf with the bloody hand prints on it. Try to go down the ladder for a cutscene.
--->
Maria will come into the room, surprised to see James there. He mistakes her for his dead wife again, but says “anyway... glad you're alive.” she blows up at him for leaving her behind... she says she was almost killed. She throws herself into James' arms and weeps, telling him to take care of her. Maria says she met Laura before and she feels she needs to go after her in order to protect her.
--->
Go down the ladder through the area that was once behind a shelf. You will find a Copper Ring on the floor. Head back up the ladder and out the door. Maria will follow. Head back up to the third floor, with the save point (and I do recommend you save), and exit the staircase.
Go into the West wing hallway, and into the elevator, careful of the nurses. Head down to the second floor and the radio will start to play something funny. It seems to be a game show called “Trick or Treat!” starring James – strange huh? The announcer will ask three questions.
--- "Trick or Treat" Puzzle --->
Question one:
Merry-Go-Round, haunted house, roller coaster, ferris wheel and tea cups. Silent Hill is home to a thrilling amusement park that both children and adults love. The question is: What is the name of this amusement park?
1. Fantasy Land
2. Silent Hill Amusement Park
3. Lakeside Amusement Park
Question two:
Silent Hill witnessed a gruesome murder a few years back.
A brother and
sister were playing in the road when they were attacked and chopped into pieces with an axe. Torn flesh, smashed bones, splattered blood, and finally... What a terrible tragedy. What gruesome end to such innocent lives. What was the name of the murderer who committed this vile act?
1. Walter Sullivan
2. Scott Fairbanks
3. Eric Gein
Question three:
South of the lake is a deserted old neighborhood called South Vale. From there to Paleville, the central resort area northwest of the lake, there's only one road you can take. Just one road, no more. The third and final question is: What is the name of that road?
1. Bachman Road
2. Rendell Street
3. Nathan Avenue
The answers to those questions will come into play very soon. If you need help figuring out the answers above, read the following:
For question 1 and 3, you can simply open your map and check it. For the answer to question 2, assuming you haven't already played SH4: The Room, you can check the memo titled "Article about murder incident" – it was the article found in the trash chute.
------>
Once you're off the elevator, head to James' left and down the hall to the end, into the Day room. Go up to the fridge and Maria will help James open it after saying that James “is supposed to be the big man around here.” She lets him have the Lead Ring, found inside.
Exit the Day room and head back to the elevator, then back to the third floor.
Optional:
If you want to participate in the “Trick or Treat” show, and want a bunch of items, head into the East wing hallway of the third floor, then into the Store room. Inside you will find a First-Aid Kit, Handgun Bullets, and Shotgun Shells on the shelf in the back of the room. One a small table you will find an elaborate box (that wasn't there before the game show radio chatter) with “1, 2, 3” going horizontally and “Q1, Q2, Q3” going vertically.
If you didn't already guess, the answer is 3 on the top row, 1 on the middle row, 3 on the bottom row. Inside the box there will be FIVE Shotgun Shells and TWO Ampoules.
Go back into the West wing hallway to the elevator, but do not go inside. I recommend you kill the nurses in the area as they can get some shots at you. Go to the door next to the elevator and use the Copper Ring and Lead Ring (combine them, it is faster), to place them on the hand coming off of the wall. This will unlock the door, so head inside.
You'll wind up in a second staircase. Take it to the bottom and you'll go by a note on the ground that reads:
I took the direckters's key – the
one to the mooseum. I hit it
behind the preying woman when
I went out for the day trip. I
picked it up but did not steal
it. I'm not a krimminal.
Before you go through the door at the end of the staircase read the strategy below.
|
| |
>>RED PYRAMID THING HALLWAY CHASE<< |
| |
WATCH THE VIDEO STRATEGY
Go through the door and follow the hallway. Once the hallway cuts to the right, the red pyramid thing will come out after Maria, that's right. No you, after Maria.
Easy or Normal Difficulty:
Do not stay and fight him, just run. Maria will get attacked a few times, but this is unavoidable. Do not worry because if you keep running and do not stop for anything Maria will live. If you need exact directions, you will need to take a right, at the first turn, a right, left, left, a right around the fenced wall, a left, and a right. Then run straight forward. If you were successful, you'll encounter a cutscene.
Hard Difficulty:
This is NOT easy. Inch forward, and keep inching forward until the red pyramid thing comes out, then immediately fire TEN bullets into it – this will slow it down (I like to manipulate Maria to get her behind me for when it comes out). Quick turn and run right, at the first turn, another right, a left, and another left. You'll see a wall with a fenced opening in it. Go around it to the other side, reload your handgun in your inventory if you have to, and shoot the red pyramid thing another TEN times through the fenced opening. You'll see Maria get away and make her way closer to you. Take a left and a right, then keep running straight. If you were successful, then a cutscene will activate. Congratulations.
--->
James will make it inside the elevator, but the doors will shut on Maria. The pyramid thing will kill her anyway and she will be left behind. The elevator will take James back up to the first floor as he slumps down to the ground in grief. He soon gets up and you regain control.
---> |
| |
<< - - - >> |
| |
WATCH THE VIDEO STRATEGY
Go left down the hallway and into the far door on the right – the Director's room. Here you'll find a map that has written on it:
He who is not bold enough
to be stared at from across
the abyss is not bold enough
to stare into it himself.
The truth can only be learned
by marching forward.
Follow the map.
There's a letter and a wrench.
James will mark down the location of the letter and wrench, circle a place in Rosewater Park, then underline Silent Hill Historical Society. You'll get the Hospital Lobby Key so you can leave. Outside the window, through the darkness, you will see Laura walking by. Leave the room. There is a Save Point next to the exit. Go ahead and leave the hospital, using the key you just got, as every door is jammed anyway. |
| ^ |
10. DARK SOUTH VALE |
| |
WATCH THE VIDEO STRATEGY
You will be treated to a short cutscene coupled with James' thoughts. You'll nee to take a right out on Carroll St. and run South into the darkness. you will meet a lot of Nurses in this part of town, but they are easy to avoid. Simply go around.
If you'd like to do some item collecting, here is a brief list of items that can be found in the part of town. This is entirely optional, so skip this paragraph if you want to continue. There are Shotgun Shells behind the Semi Truck on the Eastern side of Carroll St., a First Aid Kit, Health Drink, some Handgun Bullets, and Ampoule at the Western end of Rendell St. near construction. 2x Shotgun Shells, 2x Rifle Shells, and Handgun Bullets on the North side of Rendell St. in a fenced off area. A Health Drink and Shotgun Shells in Northwest corner of Munson St. and Rendell St. 2x Handgun Bullets and 2x Health Drinks at far Southern end of Munson St.
Once you reach the end of Carroll St., take a left onto Rendell St., Take a right on Munson St. and take yet another left at the car sitting in the intersection of Saul St. You should be in the far Southeastern part of the map. After going East for a while you'll run into a gate. Go into it. On the other side of the gate, you will find yourself on top of a bunch of metal grating with a bunch of Mandarin monsters hanging below. Careful as they can attack. Keep running and unlock the gate on the other side. You'll now be in Easter South Vale.
If you're interested in item hunting, here is a list of things you can find:
First Aid Kit and 2x Shotgun Shells outside motorhome.
First Aid Kit on Northwest corner of Neely St. and Saul St.
First Aid Kit across from Happy Burger on Neely St.
Rifle Shells at Happy Burger Menu board, and more Rifle Shells behind Happy Burger.
Two separate Health Drinks on Western side of Neely St. before Grand Market.
Handgun Bullets outside the front door of Grand Market.
Rifle Shells and Health Drink outside Big Jay's front door.
Handgun Bullets outside the front door of Bar Neely's.
2x Shotgun Shells on southwest corner of Lindsey St. and Sanders St, up some stairs.
Heath Drink in same area up different set of stairs.
2x Handgun Bullets and Shotgun Shells by a car outside Flower Shop on Sanders St.
First Aid Kit outside Flower Shop on work bench, just like last time.
Handgun Bullets outside garage door shutters on Eastern side of Lindsey St. before Vachss Rd.
Handgun Bullets outside front door of Cafe Texxan.
Once through the gate, head straight and continue past the motorhome. Take a left on Neely St, then a right at Happy Burger on Sanders St. If you wish, go into Bar Neely and read the message on the way that says: "If you ReaLly wAnt to sEE Mary, you shOUld just DiE. But You might be hEadiNg to A diffErent place than MARY, James." Otherwise, from Happy Burger take a left on Lindsey St., head North, and hug the West side of the street until you come across a peculiar house, accompanied by a camera shift. On the porch of the home will be a letter and a Wrench. Get the wrench and read the strange letter. It reads:
Or perhaps you are a fool.
The Truth usually betrays people.
A part of that abyss is
in the old society.
The key to the society
is in the park.
At the foot of the praying
woman, inside of the ground,
inside of a box.
To open it, I need a wrench.
My patient buried it there.
I knew, but did nothing.
It made me uneasy to have
such a thing near.
I wasn't looking for the truth,
I was looking for tranquility.
I also saw that thing.
I fled, but the museum
was sealed as well.
Now no one dares to
approach that place.
If you still do not wish to stop,
James,
I pray to the Lord to have
mercy on your eternal soul.
From the porch, continue North and take a left onto Katz St. There's a Health Drink and Handgun bullets up some stairs on Southern side of Katz St., First Aid Kit near fire hydrant at end of Katz St., First Aid Kit and Ampoule in fenced off area at end of Katz St., and a Health Drink in alley North of Blue Creek Apartments. Follow Katz St. to the end and go through the door next to the words: “The door that wakes in darkness, opening into nightmares.”
You'll be back out on the West side of town again. Take a right on Munson St. and continue North and go through the front entrance of Rosewater Park. From the entrance of the park go right and down some stairs, then take a left down from more stairs. Take your next left and you'll run into a "Praying Woman" statue. Go behind it and you'll get the option to dig. Do so and you'll find a box. Use the Wrench you obtained earlier to obtain the Old Bronze Key. Go out the way you came in, or collect some items:
2x Shotgun Shells near Western entrance, by a door.
Ampoule between two benches on Western side.
2x Shotgun Shells in corner North of Eastern branch.
2x Handgun Bullets in corner South of Eastern branch.
2x Handgun Bullets up some stairs, heading back to entrance of Blue Creek.
Take a right onto Nathan Ave. and go towards the Historical Society as marked on your map. you will encounter more Nurses and Mannequins, but they shouldn't be a problem. There will be a First Aid Kit by the boat dock. Go to the front door of the Historical Society and use the key on the door. After that, go inside.
|
| ^ |
11. HISTORICAL SOCIETY |
| |
WATCH THE VIDEO STRATEGY
No available maps for this section. But it is pretty linear, so you won't get lost. To the left is a Save Point. Go into the main room. In this room you will find a little history about the town in the paintings on the walls. One painting is missing with the following description:
"Waterfront landscape"
Allen Smith (Date of birth and death unknown)
A scene of this area from long ago.
From the style, it looks like it was
done sometime around 1820.
There were a lot fewer people then,
and only a handful of buildings.
Another painting reads:
"Misty day, remains of the Judgment"
James recognizes the figure in the painting by saying "It's him...". There is also a photo hanging of Wiltse Coal Mine. Go into the gray double-doors into the next area. In here are a bunch of photographs on the walls.
If you've beaten the game once, you can acquire the Obsidian Goblet in the broken display case to help you get the REBIRTH Ending.
On the walls several photographs read:
Brookhaven Hospital(1880)
This hospital was built in
response to a great plague
that followed a wave of
immigration to this area.
It was originally little more
than a shack, but it gradually
grew and grew.
A photo of the Director of the old
Brookhaven Hospital. It looks like
he was a famous person in town.
There there is a photo of a deep, deep hole. We will find out what this is later on in the game. You will see a giant hole in the wall with a green tinted hallway behind it. Follow this hallway down and down for minutes, then go through the door.
Inside the next room a document reads:
September 11, 1820
Prisoner number: C-221
This document is an indicator that we went to a prison that does not exist anymore. There's a First-Aid Kit on the other side of the column. Leave the room. There are two patient demons in the area. Run right by one and go left, go right at the intersection and into the door on the immediate right. In this little room you'll see Handgun Bullets. Starting with the first painting/photograph it reads:
Crimson and White Banquet
for the Gods
Death by Skewering
An execution at the prison.
Death by Skewering or Strangling.
To choose his death is the
prisoner's last taste of freedom.
Toluca Prison Camp
Built during the Civil War.
Later became Toluca Prison.
Leave the room. When you come out, go right and pass a patient demon, then head into the door at the end. Remember this room from somewhere? Simply choose to jump into the dark hole.
You'll be inside of a well. Go 90 degrees to the left of where you're standing and examine the wall. It should say something like, "Huh? This is different..." When you get this message, go into your inventory and equip any melee weapon. Use it to break open that part of the wall, then go through the door.
You'll be in a sewer like area. Turn right, and head left around the patient demons you encounter, then go up the small steps to the first door on the right.
Go into the next door on the right.
You'll be in a small room. Pick up the Spiral-Writing Key and your light will go out. Don't fear! Simply go into your inventory and use the Dry Cell Battery you got in the hospital. You will be shocked at what you'll find. Avoid the bugs and make your way to the little control panel on the side of the door.
--- Roach Trap Puzzle --->
On any difficulty there are two or three buttons a little lighter than the rest. This is assuming these buttons are the most used and most likely is a part of the combination. You just got to hit any combination of these buttons until you get the right one. It is random every time you play and just takes trial an error. It is intense because the bugs are munching on your feet as you do this.
------>
Once you get the combination, leave and go right into what seems to be a strange hallway. Use the Spiral-Witing Key anywhere on the doors and they will open. Jump down.
|
| ^ |
12. PRISON & DESCENT |
| |

WATCH THE VIDEO STRATEGY
--->
James looks around to find Eddie sitting there with a gun. Eddie admits to killing a guy sitting at the table. He says that he was making fun of him with his eyes. James tells Eddie that he can't kill someone for the way they look at him. And he doesn't seem to understand what's so wrong with that and goes on to say that the dog he killed "had it coming"
too. He then laughs and says he was just joking. "He was dead when I got here!" Eddie leaves.
--->
Take the Health Drink on the table that James is staring at. In the back of the room next to a painting of the room is a Tablet of 'Gluttonous Pig'. This is a key item. Turn around, and on a column is a Save Point. After that, it is safe to leave the room through the double-doors at the end.
Turn left and run down the hallway going South. Pick up the Handgun Bullets on the first desk and a map of prison on the next desk, avoiding all creatures that get in the way.
Quick turn, heading North, and go into the first big double-doors on the left. Turn left and go this way, around into the open shower area. Pick up the Tablet of 'The Seductress' at the end. Turn around and go out the way you came in. Go left, heading North again, and go past the desk on the right, then through the door on the left.
You will now be in the North cell block. You will hear a creature stomping around in here, but do not be alarmed, it cannot hurt you. Visit the open cell in the middle and grab the Handgun Bullets, then visit the open cell on the end for the wax doll. Quick turn and go right, out the other end of the cell block. You will wind up in another long hallway like before, go left (South), through the open gate and take the Handgun Bullets off of the desk. Then go left into the green double doors for some Rifle Shells, careful though, there's a creature in here. Leave the room and go left again, through an open gate. Watch out for more creatures. Then go into the next door on the left.
You will be in the South cell block. Immediately turn right and enter the cell with the paintings. There are three paintings to examine here: 436 People at a Recital, Burning Man, Woman in Flight - they are merely here for background story purposes. Leave the cell and go right, pass five more cells and enter the sixth one, next to another grumbling stomping creature. Again, it will not hurt you. On the bed, pick up the Tablet of "The Oppressor". In this room you will find a series of books such as: "Black Magic from the Abyss", "Resurrection of the Dead", "The Chronicle of Agrippa", "Manuscript of the Iron Rings", "On Sacrifice and the Art of Demon-Summoning", "Tome of the Seer"
and upon leaving the cell you will find that you were LOCKED IN! Just keep trying and on the fourth try the door opens. Now that you got all three tablets, head back East. If you unlocked a door, then you went the wrong way. Exit the cell block and go right (South) and go into the Courtyard via the only double-doors on the East wall.
You'll find nothing but darkness. Don't fret. Simply run straight forward until you get to a sort of gallows with two Pyramid Heads holding spears on a plaque. Examine the plaque and it reads: "I give you blood to atone for Three Sins". Stand directly in front of this platform and enter your inventory. COMBINE all three plates by selecting "combine" on the first one, hit circle, move to the next, hit "combine", hit circle, move to the next, hit "combine", then "Use". Or you can do it one-by-one. You will hear a gut-wrenching scream. Quick turn and head back towards the exit. You'll reach the double-doors, but you'll notice a horseshoe was left behind on the handle. Exit.
Now head right (North) back to the North cell block. Go the the end and unlock the door, the go through it. The door almost directly across the hall contains a First-Aid Kit. North of that door is a passage to the next hallway.
Immediately go left and into the next door on the left. There is a lighter on the counter. Leave this room and go left. Head South down the hall and enter the last door on the right, before the metal gate. There will be a creature in this room, accompanied by a First-Aid Kit, Ampoule, and a Health Drink. A magazine on the desk reads:
Toluca Lake, the town's main
tourist attraction.
This clear, beautiful lake has
another side as well.
It may seem just like a typical
ghost story that you might find
in any number of old towns
across the country.
But in this case, the legend
is true.
On a fog-bound November day in
1918, the Little Baroness, a ship
filled with tourists, failed to return
to port.
A newspaper article from back
then simply says "It most likely
sunk for some reason". Despite
an extensive police search, not
a single fragment of the ship nor
any of the 14 bodies of
passengers or crew has ever
been recovered to this day.
In 1939, an even stranger incident
occurred.
[There are many pages torn out]
Many corpses rest at the bottom
of this lake. Their bony hands
reach up towards the boats that
pass overhead. Perhaps they
reach for their comrades?
In this same room you can find a guard journal:
Prisoners do not feel remorse.
In fact, they do not feel themselves
to be villains at all. Even the most
uneducated brute will use what
little words he knows to justify
himself.
And such trifling dreams they
have, flourishing even in the
darkness. Prisoners, too, are
no exception.
No matter how foul nor loathsome
one's own life and existence may
be, human nature is abiding.
Go through the green door and grab the Handgun Bullets in front, Shotgun and Rifle Shells in the broken display case on the right, and the Hunting Rifle as well as more Rifle Shells in the back end of the room. Leave this small room, then the other small room with the TV, and exit back into the hallway. There's a Save Point above the urinal in the Men's Restroom, but other than that you can just turn right and go through the metal gate.
Every door here is either locked or broken, so just stand in front of the metallic hatch on the ground and go into your inventory. COMBINE the wax doll, horseshoe, and lighter by selecting one, hit "combine", circle button, move to other item, hit "combine", circle, move to last item, hit "combine" then "use". You will be shown a handle being made out of melted wax and a horseshoe. If the wax could really hold up in reality, is another story. In this case, it opens a hatch for you to jump into. Select "Yes", you will jump in.
In a brief cutscene, James will jump down and land on his rear. He will stand up, facing away from the camera.
Do a quick turn and head into the door straight ahead. Simply pass the morgue and all the bodies, you don't necessarily need to examine them, although you will get some interesting reactions from James. Go through the door on the other side to find a dead body on a stretcher to the right. You will find another hole to jump down into. Select "Yes", you will go down.
In this brief cutscene, James will jump down and yet again land on his rear. He will stand up,
Run forward and open the door to reveal... another hole! Select "Yes", you will go down.
In another cutscene, James will jump, but land on his belly. He will stand.
Walk forward, into the elevator. The doors will shut on you and the elevator will start to descend. Pick up Rifle Shells, Handgun Bullets, Shotgun Shells, and a First-Aid Kit from each corner. Just wait for the elevator to finish its decent (it may be a while).
|
| ^ |
13. LABYRINTH |
| |
|
| |
>>ABSTRACT DADDY<< |
| |
|
| |
<< - - - >> |
| |
|
| |
>>EDDIE<< |
| |
|
| ^ |
14. BOAT |
| |
|
| ^ |
15. LAKESIDE HOTEL |
| |
|
| |
>>DUAL PH FIGHT<< |
| |
|
| |
<< - - - >> |
| |
|
| |
>>FINAL BOSS<< |
| |
|
| |
>>THE END<< |
| |
|
| ^ |
THE ENDINGS, GAME RESULT, NEXT FEAR |
| |
|
| > |
SECRETS AND ENDINGS |